Windows Forms: Insert Update Delete and View data from SQL Database using ADO.Net in C#
By FoxLearn 3/20/2020 7:00:08 PM 31.87K
This post shows you how to insert update delete data in datagridview using ado.net, metro framework in c# .net windows forms application.
To create a simple crud c# ado.net, you can use metro framework to create a modern ui design, then use the ado.net library to help you execute the sql command. So, you should install metroframework and ado.net for your project by right-clicking on your project, then select Manage NuGet Packages -> Search metro framework, ado.net -> Install
The Metro Framework library is an open source that helps you design modern ui windows application.
The ADO.NET library is an open source that helps you execute sql query, then mapping data return from the sql database to entity.
If you don't see the metro framework in your toolbox, you can view How to download and install metro framework
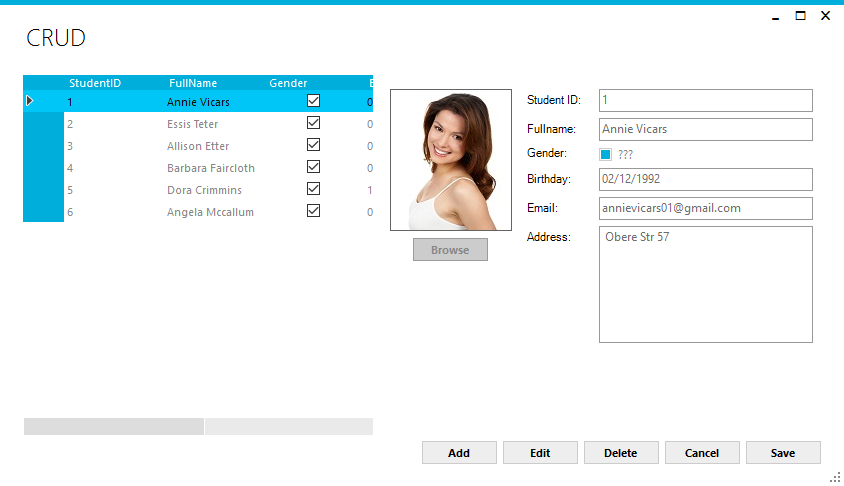
After installing the metro framework and ado.net, you can drag the MetroGrid, MetroLabel, PictureBox, MetroTextBox and MetroButton controls from the visual studio toolbox to your metro form, then design a simple ui that allows you to insert update delete data in sql database using c# as shown belown.
 Create the Student class allows you to map data return from sql server.
public class Student
{
    public int StudentID { get; set; }
    public string FullName { get; set; }
    public string Birthday { get; set; }
    public string Email { get; set; }
    public string Address { get; set; }
    public string ImageUrl { get; set; }
    public bool Gender { get; set; }
}
To play the demo, you should create a new database, then add the Student table to your database. You can execute the sql script below to create the Student table.
CREATE TABLE [dbo].[Students](
	[StudentID] [int] IDENTITY(1,1) NOT NULL,
	[FullName] [nvarchar](100) NULL,
	[Birthday] [varchar](10) NULL,
	[Gender] [bit] NULL,
	[Email] [varchar](100) NULL,
	[Address] [nvarchar](250) NULL,
	[ImageUrl] [varchar](250) NULL,
 CONSTRAINT [PK_Students] PRIMARY KEY CLUSTERED
(
	[StudentID] ASC
)WITH (PAD_INDEX = OFF, STATISTICS_NORECOMPUTE = OFF, IGNORE_DUP_KEY = OFF, ALLOW_ROW_LOCKS = ON, ALLOW_PAGE_LOCKS = ON) ON [PRIMARY]
) ON [PRIMARY]
You can also create the stored procedure to help you update data to the Student table.
create procedure [dbo].[sp_Students_Update]
(
	@StudentID int output,
	@FullName nvarchar(100),
	@Birthday varchar(10),
	@Gender bit,
	@Email varchar(100),
	@Address nvarchar(250),
	@ImageUrl varchar(250)
)
as
	update Students set FullName = @FullName, Birthday = @Birthday, Gender = @Gender, Email = @Email, [Address] = @Address, ImageUrl = @ImageUrl
	where StudentID = @StudentID
Creating an EntityState to help you manage objects state.
public enum EntityState
{
    Unchanged,
    Added,
    Changed,
    Deleted
}
And don't forget to add a connection string to the App.config file. You should change the sql account in the connection string corresponding to the sql account in your sql server.
<configuration>
  <connectionStrings>
    <add name = "cn" connectionString="Data Source=.;Initial Catalog=dbstudent;User ID=sa;Password=123@qaz;" providerName="System.Data.SqlClient"/>
  </connectionStrings>
</configuration>
You can easily change the connection string from the App.config file without recompiling the program.
First off, To create the metro form, you should change inheritance from Form to the MetroForm as the following c# code.
public partial class Form1 : MetroFramework.Forms.MetroForm
Creating an objState variable that helps you manage your entity state.
//Set default state
EntityState objState = EntityState.Unchanged;
Add the button click event handler to the Browse button allows you to select an image from your disk, then display on the PictureBox control. And don't forget to add the BindingSource to MetroGrid, then select the Student class for BindingSource.
//Select an image
private void btnBrowse_Click(object sender, EventArgs e)
{
    using (OpenFileDialog ofd = new OpenFileDialog() { Filter = "JPEG|*.jpg|PNG|*.png", ValidateNames = true })
    {
        if (ofd.ShowDialog() == DialogResult.OK)
        {
            pic.Image = Image.FromFile(ofd.FileName);
            //Get current object
            Student obj = studentBindingSource.Current as Student;
            if (obj != null)
                obj.ImageUrl = ofd.FileName;
        }
    }
}
Add the Load event handler to your winform, then initialize the c# code to help you retrieve data from the sql database as shown below.
private void Form1_Load(object sender, EventArgs e)
{
    //Connect to sql database
    using (var db = Db.FromConfig("cn"))
    {
        studentBindingSource.DataSource = db.Sql("select *from Students").AsEnumerable<Student>();
    }
    pContainer.Enabled = false;
    Student obj = studentBindingSource.Current as Student;
    if (obj != null)
    {
        if (!string.IsNullOrEmpty(obj.ImageUrl))
            pic.Image = Image.FromFile(obj.ImageUrl);//Load image to PictureBox
    }
}
Add the click event handler to the Add button allows you to create new a Student object, then add the student object to the BindingSource.
//Add new object to binding source
private void btnAdd_Click(object sender, EventArgs e)
{
    objState = EntityState.Added;
    pic.Image = null;
    pContainer.Enabled = true;
    studentBindingSource.Add(new Student());
    studentBindingSource.MoveLast();
    txtFullName.Focus();
}
Add the click event handler to the Edit button, allowing you to set the state to the student object.
private void btnEdit_Click(object sender, EventArgs e)
{
    objState = EntityState.Changed;
    pContainer.Enabled = true;
    txtFullName.Focus();
}
Add the click event handler to the Delete button, allowing you to delete the student object from sql database, then remove the student object from the BindingSource.
private void btnDelete_Click(object sender, EventArgs e)
{
    if (MetroFramework.MetroMessageBox.Show(this, "Are you sure want to delete this record?", "Message", MessageBoxButtons.YesNo, MessageBoxIcon.Question) == DialogResult.Yes)
    {
        objState = EntityState.Deleted;
        try
        {
            Student obj = studentBindingSource.Current as Student;
            if (obj != null)
            {
                using (var db = Db.FromConfig("cn"))
                {
                    db.Sql("delete from Students where StudentID = @StudentID").WithParameters(new { StudentID = obj.StudentID }).AsNonQuery();
                    studentBindingSource.RemoveCurrent();
                    pContainer.Enabled = false;
                    ClearInput();
                    objState = EntityState.Unchanged;
                }
            }
        }
        catch (Exception ex)
        {
            MetroFramework.MetroMessageBox.Show(this, ex.Message, "Message", MessageBoxButtons.OK, MessageBoxIcon.Error);
        }
    }
}
Add the click event handler to the Cancel button allowing you to cancel operation update, insert, then retrieve data again from the sql database.
private void btnCancel_Click(object sender, EventArgs e)
{
    pContainer.Enabled = false;
    //Reset binding source
    studentBindingSource.ResetBindings(false);
    this.Form1_Load(sender, e);
}
You can also create the Save button allows you to detect student state, then excute sql insert or update based on student object state.
private void btnSave_Click(object sender, EventArgs e)
{
    try
    {
        studentBindingSource.EndEdit();
        //Get current object
        Student obj = studentBindingSource.Current as Student;
        if (obj != null)
        {
            using (var db = Db.FromConfig("cn"))
            {
                if (objState == EntityState.Added)
                {
                    //Execute sql insert query
                    obj.StudentID = db.Sql("insert into Students(FullName, Email, Gender, Address, ImageUrl, Birthday) values(@FullName, @Email, @Gender, @Address, @ImageUrl, @Birthday);select SCOPE_IDENTITY()").WithParameters(new { FullName = obj.FullName, Email = obj.Email, Address = obj.Address, ImageUrl = obj.ImageUrl, Gender = obj.Gender, Birthday = obj.Birthday }).AsScalar<int>();
                }
                else if (objState == EntityState.Changed)
                {
                    //Execute stored procedure update
                    db.StoredProcedure("sp_Students_Update").WithParameters(new { StudentID = obj.StudentID, FullName = obj.FullName, Email = obj.Email, Address = obj.Address, ImageUrl = obj.ImageUrl, Gender = obj.Gender, Birthday = obj.Birthday }).AsNonQuery();
                }
                metroGrid.Refresh();
                pContainer.Enabled = false;
                objState = EntityState.Unchanged;
            }
        }
    }
    catch (Exception ex)
    {
        MetroFramework.MetroMessageBox.Show(this, ex.Message, "Message", MessageBoxButtons.OK, MessageBoxIcon.Error);
    }
}
Finally, Add the CellClick event handler on the MetroGrid that allows you to load an image from your disk corresponding to the image file.
private void metroGrid_CellClick(object sender, DataGridViewCellEventArgs e)
{
    Student obj = studentBindingSource.Current as Student;//Get current object
    if (obj != null)
    {
        if (!string.IsNullOrEmpty(obj.ImageUrl))
            pic.Image = Image.FromFile(obj.ImageUrl);//Load image to PictureBox
    }
}
Through the c# example, you've learned how to create a simple crud c# .net windows forms application using ado.net and metro framework library.
VIDEO TUTORIAL
Categories
Popular Posts


Visual Studio: Auto increment version
04/01/2024

What is ARM architecture?
04/01/2024

What Are RESTful Web Services?
02/19/2024