How to make a WhatsApp Messenger in C#
By Tan Lee Published on Jun 01, 2017 10.87K
In this article, we will walk through creating a simple Windows Forms application to send and receive messages using the WhatsApp API. The application uses the WhatsAppApi library and demonstrates how to handle connections, logins, and messaging.
How to make a WhatsApp Messenger in C#?
Open Visual Studio, then click New Project, then select Visual C# on the left, then Windows and then select Windows Forms Application. Name your project "WhatsAppMessenger" and then click OK
Download WhatsApp API. This is an API written in C# but it can be used in any .NET language. It's a fork from WhatsAPINet, which is based on Chat API
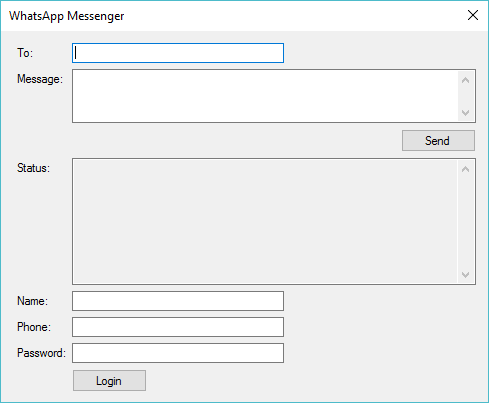
Design your form as shown below.

The application manages messaging through the WhatsApp class and handles connection and message polling in a separate thread.
using System;
using System.Windows.Forms;
using WhatsAppApi.Account;
using WhatsAppApi;
using System.Threading;

// api whatsapp c#
namespace WhatsAppMessenger
{
    public partial class Form1 : Form
    {
        WhatsApp wa;
        WhatsUser user;

        public Form1()
        {
            InitializeComponent();
        }

        //Using delegate to update textbox
        private delegate void UpdateTextBox(TextBox textbox, string value);
        public void UpdateDataTextBox(TextBox textbox, string value)
        {
            textbox.Text += value;
        }

        private void btnSend_Click(object sender, EventArgs e)
        {
            if (string.IsNullOrEmpty(txtMessage.Text))
                return;
            if (wa != null)
            {
                //Check status
                if (wa.ConnectionStatus == ApiBase.CONNECTION_STATUS.LOGGEDIN)
                {
                    wa.SendMessage(txtTo.Text, txtMessage.Text);
                    txtStatus.Text += string.Format("\r\n{0}:{1}", user.Nickname, txtMessage.Text);
                    txtMessage.Clear();
                    txtMessage.Focus();
                }
            }
        }

        private void btnLogin_Click(object sender, EventArgs e)
        {
            WhatsUserManager manager = new WhatsUserManager();
            user = manager.CreateUser(txtPhone.Text, txtName.Text);
            //Create a new thread to send message
            var thread = new Thread(t =>
            {
                UpdateTextBox textbox = UpdateDataTextBox;
                wa = new WhatsApp(txtPhone.Text, txtPassword.Text, txtName.Text, true);
                wa.OnConnectSuccess += () =>
                {
                    if (txtStatus.InvokeRequired)
                        Invoke(textbox, txtStatus, "Connected...");
                    wa.OnLoginSuccess += (phone, data) =>
                    {
                        if (txtStatus.InvokeRequired)
                            Invoke(textbox, txtStatus, "\r\nLogin success !");
                        while (wa != null)
                        {
                            wa.PollMessages();
                            Thread.Sleep(200);
                            continue;
                        }
                    };
                    wa.OnGetMessage += (node, from, id, name, message, receipt_sent) =>
                    {
                        if (txtStatus.InvokeRequired)
                            Invoke(textbox, txtStatus, string.Format("\r\n{0}:{1}", name, message));
                    };
                    wa.OnLoginFailed += (data) =>
                    {
                        if (txtStatus.InvokeRequired)
                            Invoke(textbox, txtStatus, string.Format("\r\nLogin failed: {0}", data));
                    };
                    wa.Login();
                };
                wa.OnConnectFailed += (ex) =>
                {
                    if (txtStatus.InvokeRequired)
                        Invoke(textbox, txtStatus, string.Format("\r\nConnect failed: {0}", ex.StackTrace));
                };
                wa.Connect();
            }) { IsBackground = true };
            thread.Start();
        }
    }
}
VIDEO TUTORIAL


