Building a Custom Request Pipeline with ASP.NET Core Middleware
By Tan Lee Published on Dec 14, 2024 694
Middleware was introduced in ASP.NET with .NET Core to provide more control over the web application's request pipeline. This approach allows developers to configure and customize how requests are handled, enabling greater flexibility and modularity in processing requests and responses.
Understand Middleware Basics
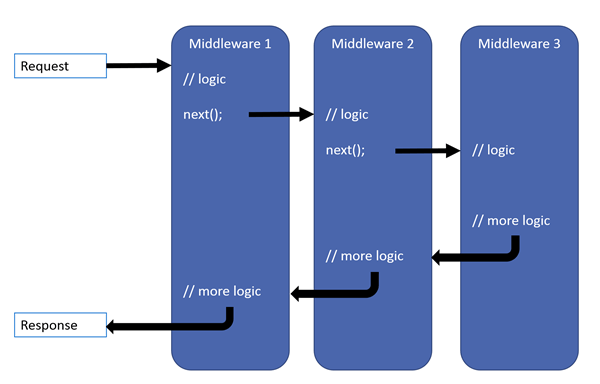
ASP.NET Core Middleware is a code component that runs on every HTTP request, allowing you to handle requests and responses. It includes built-in middleware, such as routing, session management, and MVC, and also supports custom middleware that you can create. These middleware components form an application pipeline, where each piece is executed in the order they are configured, providing flexibility in processing requests and responses.
The request pipeline in ASP.NET Core can consist of a mix of built-in middleware, third-party middleware, and custom middleware. Middleware can be added using request delegates that manage HTTP requests. These delegates are configured using methods like Run, Use, and Map in the Configure method of Startup.cs. Additionally, middleware can be encapsulated in separate, reusable classes for better modularity and reusability.
Each middleware in ASP.NET Core can decide how to handle a request based on its type. It can perform operations before and after the next middleware in the pipeline, pass the request to the next component, or short-circuit the pipeline by generating a response. Middleware that stops further processing and generates a response is called terminal middleware.

Create a middleware with IApplicationBuilder
To create middleware in ASP.NET Core using IApplicationBuilder, you can use methods like Run, Use, and Map:
public class Startup
{
    public void Configure(IApplicationBuilder app)
    {
        // Add custom middleware to the pipeline
        app.Use(async (context, next) =>
        {
            // Custom logic before passing control to the next middleware
            Console.WriteLine("Request received at: " + DateTime.Now);

            // Pass the request to the next middleware in the pipeline
            await next.Invoke();
        });

        // Add terminal middleware that generates a response
        app.Run(async context =>
        {
            // This middleware will be the last one to run, generating a response
            await context.Response.WriteAsync("Response from terminal middleware!");
        });
    }
}
Use: The first middleware is a non-terminal middleware. It logs a message and then calls next.Invoke() to pass control to the next middleware in the pipeline.
Run: The second middleware is terminal, meaning it will generate the response and stop further processing of the request. The response is written as "Response from terminal middleware!" and no other middleware will be executed after this.
Once the response has been sent to the client, you should not call next.Invoke() or make any further modifications to the response. Attempting to modify the response after it has started will result in an exception, as the response is already being processed and sent back to the client.
Map and MapWhen are used to reroute requests to different middleware components based on the incoming request. Map matches specific request paths, while MapWhen allows for more flexible rerouting based on custom conditions. Both methods alter the request pipeline by conditionally applying middleware depending on the request's characteristics.
public class Startup
{
    // Middleware for handling the '/contact' path
    private static void HandleContact(IApplicationBuilder app)
    {
        app.Run(async context =>
        {
            await context.Response.WriteAsync("Contact us at [email protected]");
        });
    }

    // Middleware for handling the '/about' path
    private static void HandleAbout(IApplicationBuilder app)
    {
        app.Run(async context =>
        {
            await context.Response.WriteAsync("Hi from lucy");
        });
    }

    // Middleware for handling the '/welcome' path based on a query parameter
    private static void HandleWelcome(IApplicationBuilder app)
    {
        app.Run(async context =>
        {
            await context.Response.WriteAsync("Welcome to our Blog");
        });
    }

    public void Configure(IApplicationBuilder app)
    {
        // Map specific routes to their corresponding middleware
        app.Map("/contact", HandleContact);  // Matches /contact URL
        app.Map("/about", HandleAbout);      // Matches /about URL

        // Conditionally map when the query string contains a 'welcome' parameter
        app.MapWhen(context => context.Request.Query.ContainsKey("welcome"), HandleWelcome);

        // Default handler for all other requests
        app.Run(async context =>
        {
            await context.Response.WriteAsync("Hello from delegate without Map!");
        });
    }
}
How to Custom Request Pipeline with ASP.NET Core Middleware?
As the complexity of the request pipeline grows, maintaining request delegates directly in Startup.cs becomes challenging. To keep the code clean and adhere to the single responsibility principle, middleware is typically implemented as standalone, reusable classes. These middleware classes contain an Invoke method with the core logic and a constructor that accepts a RequestDelegate, allowing them to be modular and easier to maintain.
public class MyCustomMiddleware
{
    private readonly RequestDelegate _next;
    public MyCustomMiddleware(RequestDelegate next)
    {
        _next = next;
    }

    public async Task Invoke(HttpContext httpContext)
    {
        // Pre-processing logic
        Console.WriteLine("Processing request...");

        // Call the next middleware in the pipeline
        await _next(context);

        // Post-processing logic
        Console.WriteLine("Processing response...");
    }
}
The middleware class can be used directly in the Startup.cs file, but for better code organization and cleanliness, an extension class can be created that utilizes IApplicationBuilder. This extension method can then be invoked in the Configure method of the Startup.cs file, simplifying the configuration process.
Add an extension method to simplify registration.
public static class MyCustomMiddlewareExtensions
{
    public static IApplicationBuilder UseMyCustomMiddleware(this IApplicationBuilder builder)
    {
        return builder.UseMiddleware();
    }
}
Middleware must be added to the request pipeline in the Configure method:
public class Startup
{
    public void Configure(IApplicationBuilder app, IWebHostEnvironment env)
    {
        // Example: Add custom middleware
        app.UseMyCustomMiddleware();

        // Example: Built-in middleware
        app.UseRouting();
        app.UseAuthentication();
        app.UseAuthorization();

        app.UseEndpoints(endpoints =>
        {
            endpoints.MapControllers();
        });
    }
}
In ASP.NET Core, the request processing pipeline consists of a sequence of middleware components that handle requests and responses in a defined order. This sequence, known as Middleware Order, is determined by the order in which middleware components are added in the Configure method of the Startup class. The arrangement directly affects how requests are processed and responses are generated.
- How to Initialize TagHelpers in ASP.NET Core with Shared Data
- Boost Your ASP.NET Core Website Performance with .NET Profiler
- The name 'Session' does not exist in the current context
- Implementing Two-Factor Authentication with Google Authenticator in ASP.NET Core
- How to securely reverse-proxy ASP.NET Core
- How to Retrieve Client IP in ASP.NET Core Behind a Reverse Proxy
- Only one parameter per action may be bound from body in ASP.NET Core
- The request matched multiple endpoints in ASP.NET Core


