ASP.NET MVC : Login Logout in ASP.NET SQL Database with Session
By Tan Lee Published on Sep 26, 2019 14.41K
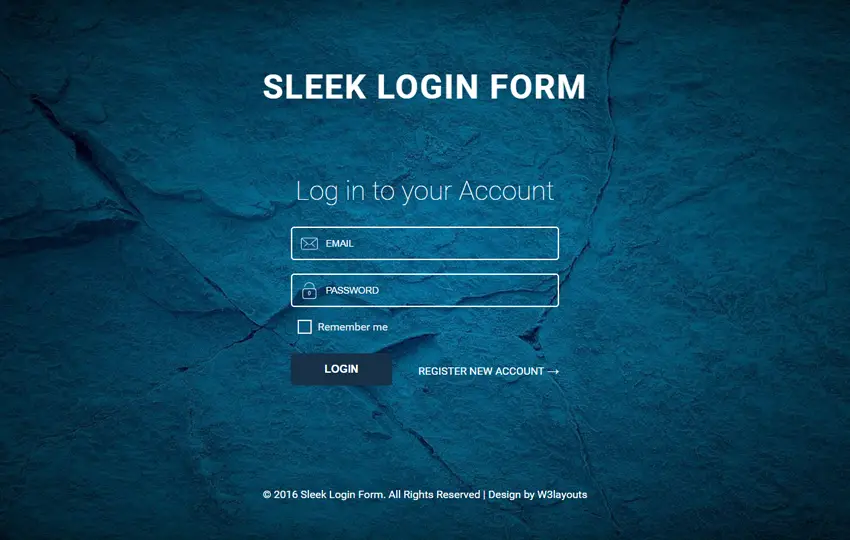
First, You need to download the Sleek Login Form A Responsive Widget Template from the w3layouts website.
It's a Flat Responsive Widget Template with brilliant design and readily fits in your web projects. This template is developed using HTML5, CSS3 and it's absolutely FREE.

It's also compatible with browsers like: Google Chrome, Firefox, Safari, IE 10, Opera, etc.
Open your AccountControler, then create a SleekLogin action as shown below.
[AllowAnonymous]
public ActionResult SleekLogin(string returnUrl)
{
    ViewBag.ReturnUrl = returnUrl;
    return View();
}
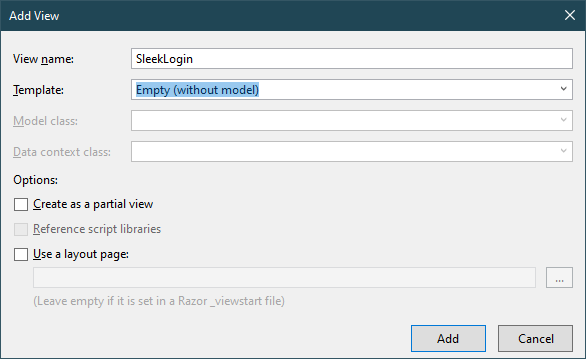
Right click on SleekLogin action, then select Add View...

You need to create a SleekLogin action for HttpPost allows you to connect to the sql database to check if the login is successful or not.
[HttpPost]
[AllowAnonymous]
[ValidateAntiForgeryToken]
public async Task<ActionResult> SleekLogin(LoginViewModel model, string returnUrl)
{
    if (!ModelState.IsValid)
    {
        return View(model);
    }

    // This doesn't count login failures towards account lockout
    // To enable password failures to trigger account lockout, change to shouldLockout: true
    var result = await SignInManager.PasswordSignInAsync(model.Email, model.Password, model.RememberMe, shouldLockout: false);
    switch (result)
    {
        case SignInStatus.Success:
            return RedirectToLocal(returnUrl);
        case SignInStatus.LockedOut:
            return View("Lockout");
        case SignInStatus.RequiresVerification:
            return RedirectToAction("SendCode", new { ReturnUrl = returnUrl, RememberMe = model.RememberMe });
        case SignInStatus.Failure:
        default:
            ModelState.AddModelError("", "Invalid login attempt.");
            return View(model);
    }
}
Open your LoginViewModel, then modify your code as shown below.
public class LoginViewModel
{
    [Required]
    [Display(Name = "Email")]
    [EmailAddress]
    public string Email { get; set; }

    [Required]
    [DataType(DataType.Password)]
    [Display(Name = "Password")]
    public string Password { get; set; }

    [Display(Name = "Remember me?")]
    public bool RememberMe { get; set; }
}
After finishing downloading Sleek Login Form A Responsive Widget Template, you need to unzip and copy the template to your web project.
Next, Select Views\Account then modify the SleekLogin view as shown below.
@model MvcDemo.Models.LoginViewModel
@{
Layout = null;
}
<!DOCTYPE html>
<html>
<!-- Head -->
<head>
<title>Sleek Login Form A Flat Responsive Widget Template :: W3layouts</title>
<!-- Meta-Tags -->
<meta name="viewport" content="width=device-width, initial-scale=1">
<meta http-equiv="Content-Type" content="text/html; charset=utf-8">
<meta name="keywords" content="Sleek Login Form Widget Responsive, Login Form Web Template, Flat Pricing Tables, Flat Drop-Downs, Sign-Up Web Templates, Flat Web Templates, Login Sign-up Responsive Web Template, Smartphone Compatible Web Template, Free Web Designs for Nokia, Samsung, LG, Sony Ericsson, Motorola Web Design">
<script type="application/x-javascript"> addEventListener("load", function() { setTimeout(hideURLbar, 0); }, false); function hideURLbar(){ window.scrollTo(0,1); } </script>
<!-- //Meta-Tags -->
<!-- Style -->
<link rel="stylesheet" href="/sleeklogin/css/style.css" type="text/css" media="all">
<!-- Fonts -->
<link href="//fonts.googleapis.com/css?family=Roboto:100,300,400,500,700,900" rel="stylesheet">
<!-- //Fonts -->
</head>
<!-- //Head -->
<!-- Body -->
<body>
<h1>SLEEK LOGIN FORM</h1>
<h2>Log in to your Account</h2>
<div class="w3layoutscontaineragileits">
@using (Html.BeginForm("SleekLogin", "Account", FormMethod.Post))
{
@Html.AntiForgeryToken()
@Html.TextBoxFor(m => m.Email, new { @placeholder = "Email" })
@Html.PasswordFor(m => m.Password, new { @placeholder = "Password" })
<ul class="agileinfotickwthree">
<li>
@Html.CheckBoxFor(m => m.RememberMe)
<label for="brand1"><span></span>Remember me</label>
</li>
</ul>
<div class="aitssendbuttonw3ls">
<input type="submit" value="LOGIN">
<p><a href="#">REGISTER NEW ACCOUNT <span>→</span></a></p>
<div class="clear"></div>
</div>
}
</div>
<div class="w3footeragile">
<p> © 2017 Sleek Login Form. All Rights Reserved | Design by <a href="#" target="_blank">W3layouts</a></p>
</div>
</body>
<!-- //Body -->
</html>Don't forget to copy css and javascript into your web project.
VIDEO TUTORIAL
- Implement security headers for an ASP.NET Core
- How to Initialize TagHelpers in ASP.NET Core with Shared Data
- Essential Tips for Securing Your ASP.NET Website
- Top Security Best Practices for ASP.NET
- Boost Your ASP.NET Core Website Performance with .NET Profiler
- The name 'Session' does not exist in the current context
- Implementing Two-Factor Authentication with Google Authenticator in ASP.NET Core
- How to securely reverse-proxy ASP.NET Core


