How to Custom icon for ClickOnce application in 'Add or Remove Programs'
By Tan Lee Published on Nov 11, 2024 1.29K
How to change the icon in 'Add or Remove Programs'?
To change the icon for a ClickOnce application in Add or Remove Programs, you can modify the registry programmatically. Ensure that the icon is included in the ClickOnce deployment.
One way to achieve this is by setting the assembly description to match the Product Name. Then, you can search for the corresponding application in the uninstall registry keys using the description, so you don’t need to hardcode the product name in your code.
Right click on your project, then select Properties
Go to the Application tab.
Under Resources, you'll see the Icon and Manifest section.
Click on the Icon field, and browse to select your .ico file.
![]()
This icon will be used for the desktop shortcut and the application's process icon.
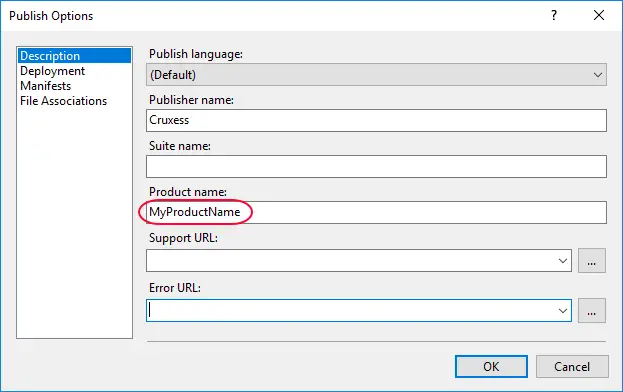
In the Project Properties window, go to the Publish tab, then click the Options button.

In the Publish Options window, note the value in the Product name field. This name is important for identifying the application during deployment or when working with registry entries.
Create an AddIconToRemovePrograms method allow you to add the icon to the Add or Remove Programs like this:
static string IconPath => Path.Combine(Application.StartupPath, "youricon.ico");

static void AddIconToRemovePrograms(string productName)
{
    try
    {   //first run after first install or after update
        if (ApplicationDeployment.IsNetworkDeployed && ApplicationDeployment.CurrentDeployment.IsFirstRun)
        {
            if (File.Exists(IconPath))
            {
                var uninstallKey = Registry.CurrentUser.OpenSubKey(@"Software\Microsoft\Windows\CurrentVersion\Uninstall");
                var subKeyNames = uninstallKey.GetSubKeyNames();
                for (int i = 0; i < subKeyNames.Length; i++)
                {
                    using (var key = uninstallKey.OpenSubKey(subKeyNames[i], true))
                    {
                        var displayName = key?.GetValue("DisplayName");
                        if (displayName == null || displayName.ToString() != productName)
                            continue;
                        //Set this to the display name of the application.
                        key.SetValue("DisplayIcon", IconPath);
                        break;
                    }
                }
            }
        }
    }
    catch (Exception ex)
    {
                        MessageBox.Show($"We could not properly setup the application icons. Please notify your software vendor of this error.{Environment.NewLine}{ex.ToString()}", "Message", MessageBoxButtons.OK, MessageBoxIcon.Error);
    }
}
Finnaly, Add this method to your main program.
static void Main()
{
    Application.EnableVisualStyles();
    Application.SetCompatibleTextRenderingDefault(false);
    AddIconToRemovePrograms("Your Product Name");
    Application.Run(new frmMain());
}
If you still don’t see the custom icon in Add/Remove Programs, you may need to check if the icon is embedded correctly in the ClickOnce deployment by rebuilding the application and ensuring all files are updated.
By following these steps, your custom icon should show up correctly in both the application itself and in Add or Remove Programs in Windows.


