Sending Emails in C#
By Tan Lee Published on Jan 08, 2025 549
While it can be challenging, creating a well-rounded email solution considering aspects like bounce handling and error monitoring can also be rewarding. This post explores various email-sending methods and highlights common mistakes to avoid.
How to send mail using SMTP client in C#?
.NET and .NET Core support email sending through the System.Net.Mail namespace, but it requires an SMTP server. Hosting your own server is not recommended today. Instead, there are many free and paid SMTP services available, and you can explore options through Google.
For example, sending emails from C# with an SMTP server.
var smtpClient = new SmtpClient("smtp.gmail.com")
{
    Port = 587,
    Credentials = new NetworkCredential("username", "password"),
    EnableSsl = true,
};

smtpClient.Send("email", "recipient", "subject", "body");
In this example, an SmtpClient is created to communicate with an SMTP server, using the server's hostname (e.g., smtp.gmail.com). The Port, Credentials, and EnableSsl properties are configured for a secure connection, typically on port 587. Replace "username" with your email and "password" with your password. Finally, the Send method is called, with "email" replaced by your address and "recipient" by the recipient's address.
Here's an example using the overloaded Send method with a MailMessage object to build the email:
var mailMessage = new MailMessage
{
    From = new MailAddress("[email protected]"),
    Subject = "Important Update",
    Body = "This is an <b>important</b> update regarding your account.",
    IsBodyHtml = true,
};
mailMessage.To.Add("[email protected]");

smtpClient.Send(mailMessage);
By using the MailMessage class, you gain access to additional properties, such as IsBodyHtml, which allows you to include HTML content in the body of the email.
How to send email using Gmail SMTP server in C#?
If you're a Google Workspace user, you can send emails using a username and password. However, it's advisable to create a new app-specific password for your C# code to avoid sharing your main password.
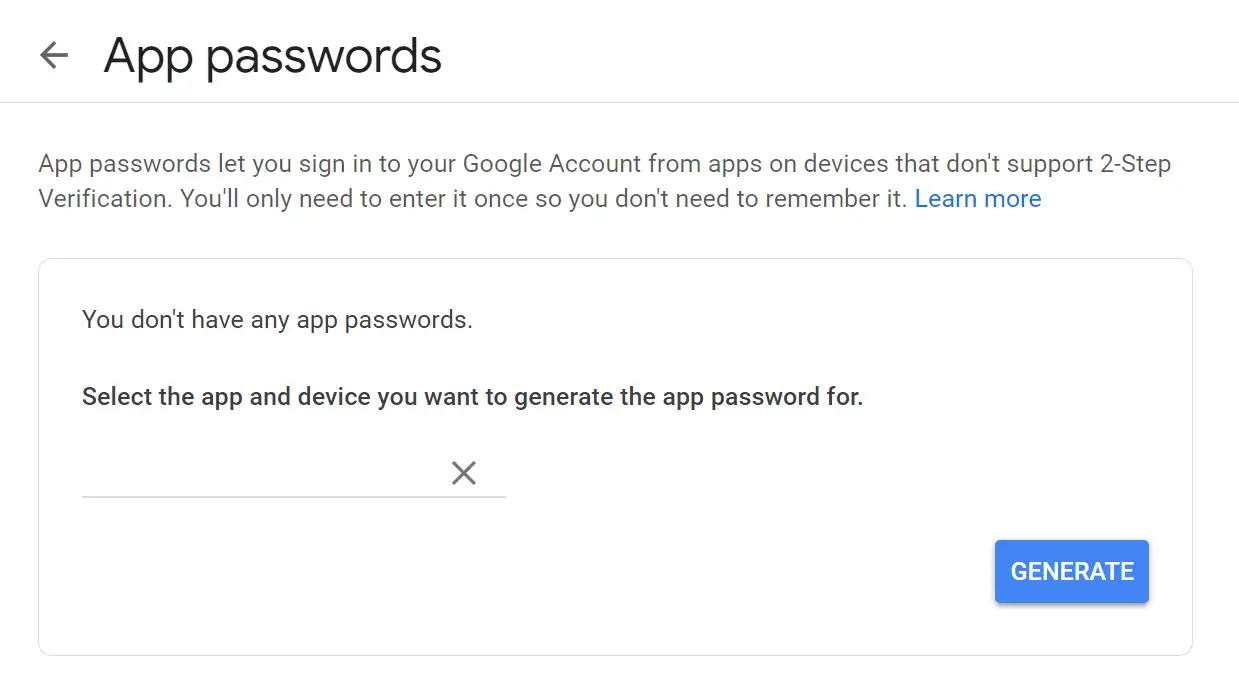
To generate a new app password, go to your Security settings, click on the "App passwords" option, then choose the "Other app" type and provide a name for it.

After clicking the GENERATE button, a new password will be created for your account. For SMTP settings, use Google's SMTP server, your email, and the newly generated password:
var smtpClient = new SmtpClient("smtp.gmail.com")
{
    Port = 587,
    Credentials = new NetworkCredential("email", "password"),
    EnableSsl = true,
};
To test sending emails via SMTP, you can use your Gmail account or create a new one. Google offers two authentication options: OAuth2 for an authentication token (not covered here due to manual user interaction) or enabling "Less secure app access" in your security settings for easier integration.
Allowing less secure apps is not recommended for production, though it works for testing. All major email providers support SMTP for sending emails. If the "Less secure app access" option is unavailable, it may be due to two-factor authentication being enabled. After enabling this option, you can use your Gmail address and app password for the SMTP server.
There are many cloud-based SMTP servers available, such as Mailchimp, Sendinblue, and Sendgrid. While I haven't tried them all, it's important to explore each service and choose the one that best suits your needs. Some of these services also offer their own .NET clients, which may be a good alternative to using the built-in SMTP client.
How to send an email with an attachment using Gmail SMTP server in C#
Attaching files to an email is straightforward and requires using the MailMessage class.
var mailMessage = new MailMessage
{
    // ...
};

var attachment = new Attachment("document.pdf", MediaTypeNames.Application.Pdf);
mailMessage.Attachments.Add(attachment);
You can also provide a full file path, and there are other overloads that accept a Stream for more flexibility.
Inline images
Instead of attaching images, you might want to inline them in the email body. This can be achieved by creating an alternate view and referencing the images using a CID:
LinkedResource linkedResource = new LinkedResource("logo.png");
linkedResource.ContentId = Guid.NewGuid().ToString();
var html = $"<h1>Welcome to our service</h1><img src=\"cid:" + linkedResource.ContentId + "\"/>";
AlternateView alternateView = AlternateView.CreateAlternateViewFromString(html, null, MediaTypeNames.Text.Html);
alternateView.LinkedResources.Add(linkedResource);

var mailMessage = new MailMessage
{
    IsBodyHtml = true,
    // ...
};

mailMessage.AlternateViews.Add(alternateView);
In this example, the image "logo.png" is embedded within the HTML content of the email, and referenced using its ContentId.
Configuring SMTP Settings
So far, configuration has been added directly in the C# code, which isn't ideal for real-world scenarios. It's better to store settings in configuration files, especially when switching between environments. In .NET, SMTP settings are stored in the app.config or web.config file under the <mailSettings> section.
<mailSettings>
    <smtp deliveryMethod="Network">
      <network host="smtp.gmail.com" port="587" userName="email" password="password" enableSsl="true" />
    </smtp>
</mailSettings>
Once configured, you can create an SmtpClient using the default constructor:
var smtpClient = new SmtpClient();
.NET Core doesn't have this built-in configuration system but stores settings in appsettings.json, which can be configured as follows:
{
  "Smtp": {
    "Host": "smtp.gmail.com",
    "Port": 587,
    "Username": "email",
    "Password": "password"
  }
}
You can then reference the settings in code like this:
var builder = new ConfigurationBuilder()
    .AddJsonFile("appsettings.json");
var config = builder.Build();

var smtpClient = new SmtpClient(config["Smtp:Host"])
{
    Port = int.Parse(config["Smtp:Port"]),
    Credentials = new NetworkCredential(config["Smtp:Username"], config["Smtp:Password"]),
    EnableSsl = true,
};
.NET also supports strongly typed options via the IOptions interface.
Sending an email using MailKit
Although the built-in SMTP client in .NET and .NET Core works well, Microsoft recommends using MailKit instead. MailKit is an open-source .NET library supporting IMAP, POP3, SMTP, and more. It has a similar interface to the built-in SMTP client.
To use it, start by installing the MailKit NuGet package.
Install-Package MailKit
Sending an email with MailKit is very similar to using the built-in SMTP client in .NET.
var mailMessage = new MimeMessage();
mailMessage.From.Add(new MailboxAddress("Sender Name", "[email protected]"));
mailMessage.To.Add(new MailboxAddress("Recipient Name", "[email protected]"));
mailMessage.Subject = "Meeting Reminder";
mailMessage.Body = new TextPart("plain")
{
    Text = "This is a reminder about the upcoming meeting."
};

using (var smtpClient = new SmtpClient())
{
    smtpClient.Connect("smtp.mailtrap.io", 587, true);
    smtpClient.Authenticate("your_username", "your_password");
    smtpClient.Send(mailMessage);
    smtpClient.Disconnect(true);
}
MailKit supports more advanced scenarios, such as reading emails through IMAP, making it a great choice for more complex email needs. In the following sections, cloud-based alternatives to SmtpClient and MailKit will be explored.
Sending an email using AWS Simple Email Service
As mentioned earlier, hosting your own SMTP server isn't ideal. Moreover, creating email content that displays well across all email clients can require a lot of code. We transitioned our email generation needs to an external provider years ago, and we now use Amazon Web Services' (AWS) Simple Email Service (SES).
Don't be misled by the name while SES is simple to use, it offers a variety of features, including email templates with handlebars code, bounce handling, send statistics, and more.
A quick note on SES and SMTP: when you sign up for SES, you’ll find the SMTP Settings menu inside AWS. SES can serve as an SMTP server, so all the SMTP code discussed earlier in this post can also be used for SES. In this section, I'll focus on some of the more advanced features of SES, rather than repeating what we've already covered.
To test SES, let's upload a template to AWS. A template is a JSON file that defines an email layout. The advantage of using templates is that you only need to specify the email to send and provide any dynamic variables. For example:
<h1>Welcome {{firstname}}!</h1>
<p>We're thrilled to have you on board. Enjoy exploring our platform.</p>
SES email templates can’t be uploaded via the AWS Console, so you need to embed the content in a JSON file like this:
{
  "Template": {
    "TemplateName": "welcome-template",
    "SubjectPart": "Welcome to Our Platform!",
    "HtmlPart": "<h1>Hi {{firstname}},</h1><p>We're excited to have you join our community. Let's get started!</p>"
  }
}
This JSON includes a template name, subject, and HTML content. You can upload the template using the AWS CLI:
aws ses create-template --cli-input-json fileb://my-email-template.json
To send the email, use the excellent SES .NET package:
Install-Package AWSSDK.SimpleEmail
Then, use the following C# code:
var emailClient = new AmazonSimpleEmailServiceClient(
    new BasicAWSCredentials("accessKey", "secretKey"),
    RegionEndpoint.USWest2);

var data = @"{
    ""firstname"": ""Lucy""
}";

var sendRequest = new SendTemplatedEmailRequest
{
    Source = "Sender <email>",
    Destination = new Destination { ToAddresses = new List<string> { recipient } },
    Template = "my-email-template",
    TemplateData = data,
};

await emailClient.SendTemplatedEmailAsync(sendRequest);
To send emails, create a new instance of the AmazonSimpleEmailServiceClient class, providing your AWS access and secret keys, as well as the region hosting your SES. The SendTemplatedEmailRequest is similar to the MailMessage class in earlier examples, specifying the sender, recipient, template name, and dynamic data. Finally, SendTemplatedEmailAsync sends the email through SES.
Sending an email using Mandrill
There are many email solutions available. Before switching to AWS, we used Mandrill (by Mailchimp). Mandrill provides many of the same features as AWS SES, but at a higher cost.
However, this price comes with additional features not found on AWS, such as an online template builder, which I won’t cover in detail here. The template functionality is similar to SES, and handlebars code can be embedded within the templates. We simply migrated our Mandrill email templates to SES, and everything worked seamlessly.
There are several .NET clients available for Mandrill, but the one I recommend is Mandrill.NET:
Install-Package Mandrill.net
Using it is similar to SES:
var mandrillApi = new MandrillApi("apikey");

var mandrillMessage = new MandrillMessage
{
    FromEmail = "email",
};
mandrillMessage.AddTo("recipient");
mandrillMessage.AddGlobalMergeVars("firstname", "Floki");

await mandrillApi.Messages.SendTemplateAsync(mandrillMessage, "my-email-template");
There are many email solutions available. Before switching to AWS, we used Mandrill (by Mailchimp). Mandrill provides many of the same features as AWS SES, but at a higher cost. However, this price comes with additional features not found on AWS, such as an online template builder, which I won’t cover in detail here. The template functionality is similar to SES, and handlebars code can be embedded within the templates. We simply migrated our Mandrill email templates to SES, and everything worked seamlessly.
There are several .NET clients available for Mandrill, but the one I recommend is Mandrill.NET:
Install-Package Mandrill.net
Using it is similar to SES:
var mandrillApi = new MandrillApi("apikey");

var mandrillMessage = new MandrillMessage
{
    FromEmail = "email",
};
mandrillMessage.AddTo("recipient");
mandrillMessage.AddGlobalMergeVars("firstname", "Floki");

await mandrillApi.Messages.SendTemplateAsync(mandrillMessage, "my-email-template");
This example demonstrates how to send a templated email using Mandrill, with merge variables included in the message.
Sending an email using SendGrid
Another email provider with strong .NET support is SendGrid. SendGrid offers both SMTP and a dedicated .NET client. When using SMTP, you can apply either the SmtpClient class or the MailKit package we've already discussed. You simply need to replace the SMTP server, port, and credentials with those provided by SendGrid.
Since we've already covered how to send emails via SMTP, let's focus on SendGrid's .NET client. First, install the SendGrid NuGet package:
Install-Package SendGrid
Sending emails with the SendGrid client follows a familiar pattern:
var sendGridClient = new SendGridClient("YOUR_API_KEY");
var from = new EmailAddress("[email protected]", "Support Team");
var subject = "Welcome to Our Service!";
var to = new EmailAddress("[email protected]", "New User");
var plainContent = "Hello! We're excited to have you with us.";
var htmlContent = "<h1>Welcome to Our Service!</h1><p>We're excited to have you with us. Please enjoy the features we offer.</p>";
var mailMessage = MailHelper.CreateSingleEmail(from, to, subject, plainContent, htmlContent);
await sendGridClient.SendEmailAsync(mailMessage);
This example demonstrates how to send an email using SendGrid's .NET client, creating a simple email with both plain text and HTML content.
Troubleshooting
This section highlights common issues when sending emails from C#.
One common error is "Username and Password not accepted," which occurs when the credentials are incorrect. Ensure both the username and password are valid. For Gmail's SMTP servers, enabling "Less secure app access" is necessary unless OAuth2 is used for authentication.
In an ASP.NET Core template application, the built-in "forgot password" feature does not send emails by default.
To enable email functionality, you need to configure ASP.NET Core to send emails using one of the previously discussed solutions.
This can be done by creating a new class and implementing an SMTP-based mailer.
public class SmtpEmailSender : IEmailSender
{
    private readonly SmtpClient smtpClient;

    public SmtpEmailSender(SmtpClient smtpClient)
    {
        this.smtpClient = smtpClient;
    }

    public async Task SendEmailAsync(string email, string subject, string htmlMessage)
    {
        var mailMessage = new MailMessage
        {
            From = new MailAddress("[email protected]"),
            Subject = subject,
            Body = htmlMessage,
            IsBodyHtml = true,
        };
        mailMessage.To.Add(email);

        await smtpClient.SendMailAsync(mailMessage);
    }
}
To configure ASP.NET Core to use this implementation, add the following code in your Startup.cs or Program.cs file:
var smtpClient = new SmtpClient("smtp.gmail.com")
{
    Port = 587,
    Credentials = new NetworkCredential("username", "password"),
    EnableSsl = true,
};

builder.Services.AddSingleton(smtpClient);
builder.Services.AddTransient<IEmailSender, SmtpEmailSender>();
This registers the SMTP client and the custom email sender class (SmtpEmailSender) with the dependency injection system.


