How to add a resource as a bitmap to C# project in Visual Studio
By Tan Lee Published on Nov 20, 2024 1.6K
Adding a bitmap or other resource to a C# project in Visual Studio 2022 involves a few steps, including embedding the resource and accessing it in your code.
When adding an image resource in a Windows Forms project, the default resource editor sometimes stores it as a byte[] instead of a System.Drawing.Bitmap.
To add images as Bitmap objects, you can use the legacy resource editor.
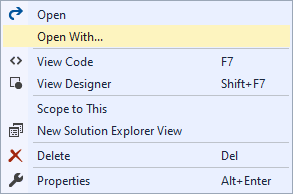
Right-click your .resx file in the Solution Explorer, then click "Open With..."
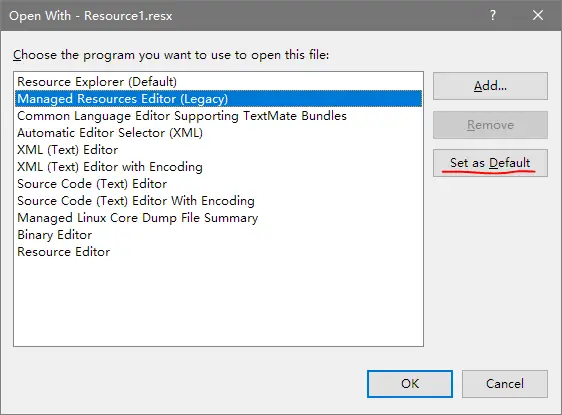
Choose Managed Resources Editor (Legacy) and click OK, you can also click "Set as Default" to make it the default editor.
In the legacy editor, add your bitmap using Add Existing File.... This ensures it is stored as a System.Drawing.Bitmap.
Open the .resx file in the legacy editor or XML editor (F7) and ensure the <data> entry for the image specifies System.Drawing.Bitmap.
For example:
<data name="MyImage" type="System.Resources.ResXFileRef, System.Windows.Forms">
    <!--value>Resources\MyImage.bmp;System.Byte[], mscorlib, Version=4.0.0.0, Culture=neutral, PublicKeyToken=b77a5c561934e089</value-->
    <value>Resources\MyImage.bmp;System.Drawing.Bitmap, System.Drawing, Version=4.0.0.0, Culture=neutral, PublicKeyToken=b03f5f7f11d50a3a</value>
Once added correctly as a System.Drawing.Bitmap, you can access it via Properties.Resources:
Bitmap bitmap = Properties.Resources.MyImage;
- How to Share a file between multiple projects in Visual Studio
- How to add .gitignore in Visual Studio
- How to set multiple startup projects in Visual Studio
- How to fix 'NonComVisibleBaseClass was detected'
- How to Auto Increment Version Number in Visual Studio
- How to Add a Custom Prerequisites to Visual Studio Setup Project
- The referenced component could not be found
- How to Auto increment version in Visual Studio
Categories
Popular Posts

Structured Data using FoxLearn.JsonLd
Jun 20, 2025

Implement security headers for an ASP.NET Core
Jun 24, 2025


What Are RESTful Web Services?
Feb 19, 2024

Plus Admin Dashboard Template
Nov 18, 2024