How to Create a Metro Login Form with SQL Database in C#
By Tan Lee Published on Jul 17, 2024 26.56K
The login form is a must-have feature in any software management. It helps users protect their data or authorize used functions corresponding to the permissions. To practice demo you should create a new windows forms project as the following.
How to Create a Metro Login Form with SQL Database in C#
Open your Visual Studio, then create a new Windows Forms project.
Next, Right click on your project, then select Manage NuGet Packages -> Search metro framework, dapper -> Install it on your project.
If you don't see the metro framework in your toolbox, you can view How to download and install metro framework
The Metro Framework is a library that supports multiple control for windows forms.
Dapper is a lightweight Object-Relational Mapping (ORM) library for .NET. It's a high performance Micro-ORM supporting SQL Server, MySQL, Sqlite, SqlCE, Firebird ...etc.
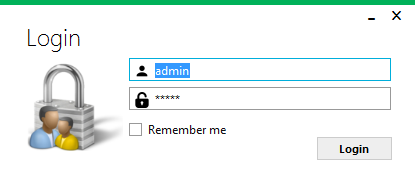
Drag the MetroTextBox, MetroButton, MetroCheckBox and Panel controls, then design a simple metro login form as shown below.

Create the User class allows you to map your data return from user table in sql server.
public class User
{
    public string UserName { get; set; }
    public string Password { get; set; }
}
You can copy the sql script below to create a new database.
USE [master]
GO
CREATE DATABASE [dbuser]
 CONTAINMENT = NONE
 ON  PRIMARY
( NAME = N'dbuser', FILENAME = N'C:\Program Files\Microsoft SQL Server\MSSQL12.MSSQLSERVER\MSSQL\DATA\dbuser.mdf' , SIZE = 4096KB , MAXSIZE = UNLIMITED, FILEGROWTH = 1024KB )
 LOG ON
( NAME = N'dbuser_log', FILENAME = N'C:\Program Files\Microsoft SQL Server\MSSQL12.MSSQLSERVER\MSSQL\DATA\dbuser_log.ldf' , SIZE = 1024KB , MAXSIZE = 2048GB , FILEGROWTH = 10%)
Next, Run the script below to create the User table.
CREATE TABLE [dbo].[Users](
	[UserName] [varchar](25) NOT NULL,
	[Password] [varchar](50) NULL,
 CONSTRAINT [PK_Users] PRIMARY KEY CLUSTERED
(
	[UserName] ASC
)WITH (PAD_INDEX = OFF, STATISTICS_NORECOMPUTE = OFF, IGNORE_DUP_KEY = OFF, ALLOW_ROW_LOCKS = ON, ALLOW_PAGE_LOCKS = ON) ON [PRIMARY]
) ON [PRIMARY]
Add a connection string to the App.config file as shown below.
  <connectionStrings>
    <add name="cn" connectionString="Data Source=.;Initial Catalog=dbuser;User ID=sa;Password=123@qaz;" providerName="System.Data.SqlClient"/>
  </connectionStrings>
You should use App.config to store your connection string, because you can easily change your connection string in the App.config file without recompiling your source code.
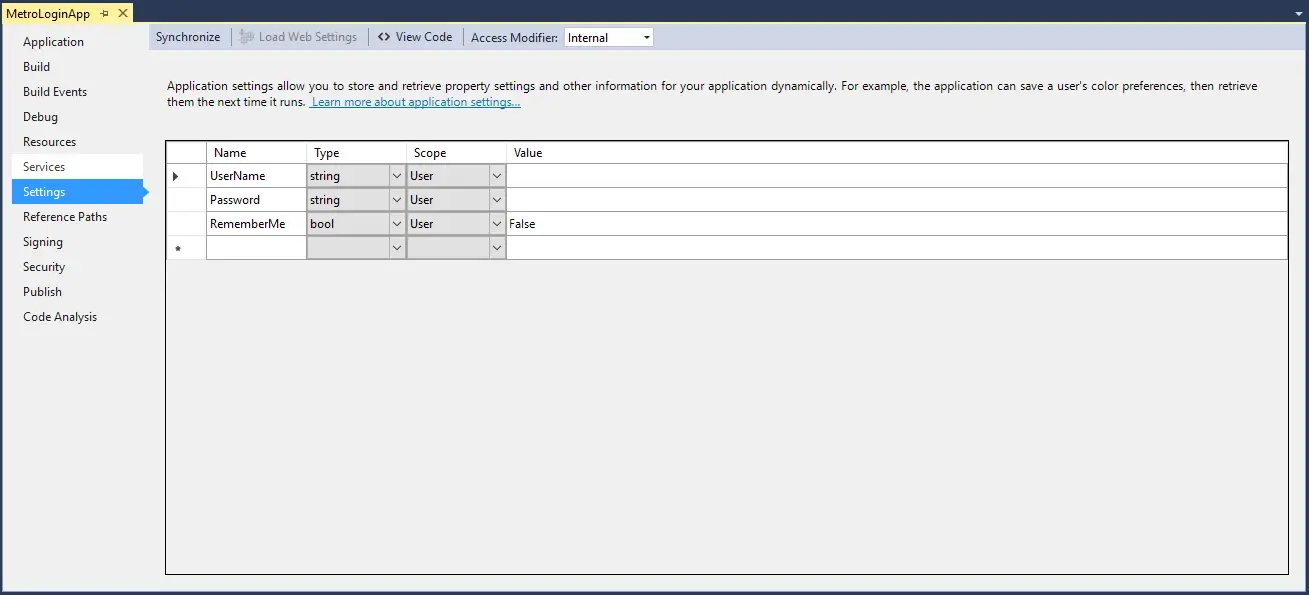
You should create the UserName, Password and RememberMe properties with the user scope in the settings tab as shown below.
Add code to handle your Form_Load event allows you to get the default value to your MetroTextBox from the User Settings.
private void frmLogin_Load(object sender, EventArgs e)
{
    //Init metro theme, style
    this.StyleManager = metroStyleManager1;
    metroStyleManager1.Theme = MetroFramework.MetroThemeStyle.Light;
    metroStyleManager1.Style = MetroFramework.MetroColorStyle.Green;
    if (Properties.Settings.Default.RememberMe)//True
    {
        //Set value to username textbox and password textbox
        txtUserName.Text = Properties.Settings.Default.UserName;
        txtPassword.Text = Properties.Settings.Default.Password;
    }
}
Add code to handle the Login button click event as shown below allows you to check username and password from your sql database.
private void btnLogin_Click(object sender, EventArgs e)
{
    //Check username is null or empty
    if (string.IsNullOrEmpty(txtUserName.Text))
    {
        MetroFramework.MetroMessageBox.Show(this, "Please enter your username.", "Message", MessageBoxButtons.OK, MessageBoxIcon.Warning);
        txtUserName.Focus();
        return;
    }
    try
    {
        using (IDbConnection db = new SqlConnection(ConfigurationManager.ConnectionStrings["cn"].ConnectionString))
        {
            if (db.State == ConnectionState.Closed)
                db.Open();
            //Excute sql query, then map data return from sql to User class
            User obj = db.Query<User>($"select *from Users where UserName = '{txtUserName.Text}'", commandType: CommandType.Text).SingleOrDefault();
            if (obj != null)
            {
                if (obj.Password == txtPassword.Text)//True
                {
                    using (frmMain frm = new frmMain())//Open main form and hide login form
                    {
                        this.Hide();
                        frm.ShowDialog();
                    }
                }
                else
                    MetroFramework.MetroMessageBox.Show(this, "Your username and password don't match.", "Message", MessageBoxButtons.OK, MessageBoxIcon.Information);
            }
            else
                MetroFramework.MetroMessageBox.Show(this, "Your username and password don't match.", "Message", MessageBoxButtons.OK, MessageBoxIcon.Information);
        }
    }
    catch (Exception ex)
    {
        MetroFramework.MetroMessageBox.Show(this, ex.Message, "Message", MessageBoxButtons.OK, MessageBoxIcon.Error);
    }
}
You can also create the LoginRepository class, then add the Login method to verify the user login as shown below.
To avoid sql injection, you should write
User obj = db.Query<User>("select *from Users where UserName = @UserName", new { UserName = txtUserName.Text}, commandType: CommandType.Text).SingleOrDefault();instead of
User obj = db.Query<User>($"select *from Users where UserName = '{txtUserName.Text}'", commandType: CommandType.Text).SingleOrDefault();Add code to handle CheckedChanged event for your MetroCheckBox
private void chkRememberMe_CheckedChanged(object sender, EventArgs e)
{
    if (chkRememberMe.Checked)//Set value to user settings
    {
        Properties.Settings.Default.UserName = txtUserName.Text;
        Properties.Settings.Default.Password = txtPassword.Text;
    }
    else
    {
        Properties.Settings.Default.UserName = null;
        Properties.Settings.Default.Password = null;
    }
    Properties.Settings.Default.RememberMe = chkRememberMe.Checked;
    Properties.Settings.Default.Save();//Save data to user settings
}
You can use the properties of the windows forms to store settings that you want.
For example: checkbox state, location state, connection string...etc
VIDEO TUTORIAL


