How to Create User Registration Or Sign Up Form With SQL Server in C#
By Tan Lee Published on Jun 21, 2024 11.93K
Creating a user registration or sign-up form in a C# Windows Forms Application using SQL Server and Dapper ORM involves several steps.
How to Create User Registration Or Sign Up Form in C#
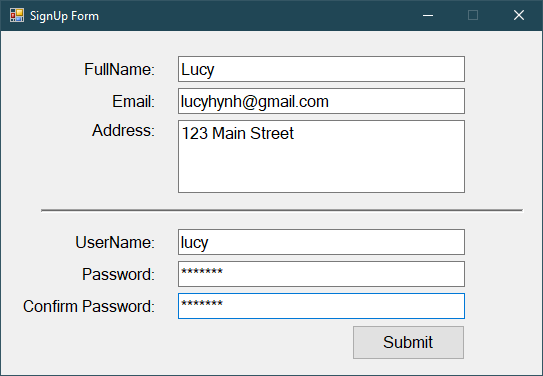
Creating a new windows forms application project, then design your sign-up form (SignUpForm) with necessary controls like textboxes for username, password, email, etc., and a button for submitting the form as shown below.
Right click on your project, then add a new item->service based database
Next, You need to connect to the local database from your visual studio, then create a simple user table.
After creating the user table, you need to add a datasource to the local database. This helps you automatically create database connection strings in the app.config file.
<?xml version="1.0" encoding="utf-8" ?>
<configuration>
    <configSections>
    </configSections>
    <connectionStrings>
        <add name="SignUpApp.Properties.Settings.cn" connectionString="Data Source=(LocalDB)\MSSQLLocalDB;AttachDbFilename=|DataDirectory|\Database.mdf;Integrated Security=True"
            providerName="System.Data.SqlClient" />
    </connectionStrings>
    <startup>
        <supportedRuntime version="v4.0" sku=".NETFramework,Version=v4.6.1" />
    </startup>
</configuration>
Create the AppHelper class allows you to get connection string from the app.config file. You can easily change your connection string in the app.config file.
public static class AppHelper
{
    public static string ConnectionString => ConfigurationManager.ConnectionStrings["SignUpApp.Properties.Settings.cn"].ConnectionString;
}
Creating a User class allows you to map data between User object and User table in your database.
public class User
{
    public string UserName { get; set; }
    public string Password { get; set; }
    public string Email { get; set; }
    public string FullName { get; set; }
    public string Address { get; set; }
}
Defining an IUserRepository interface allows you to eaily modify your code
public interface IUserRepository
{
    Task<bool> Insert(User user);
}
Creating the UserRepository class inherit from the IUserRepository interface, and don't forget to implement methods in the interface.
public class UserRepository : IUserRepository
{
    public async Task<bool> Insert(User user)
    {
        using (IDbConnection db = new SqlConnection(AppHelper.ConnectionString))
        {
            var result = await db.ExecuteAsync(SignUpApp.Properties.Resources.InsertUser, new { UserName = user.UserName, FullName = user.FullName, Email = user.Email, Address = user.Address, Password = user.Password });
            return result > 0;
        }
    }
}
We will use the UserRepository class to access to your sql database using Dapper ORM in c#. So, you need to search and install the Dapper from the Manage Nuget Packages to your project.
As you know, Dapper ORM is a high performance Micro-ORM supporting SQL Server, MySQL, Sqlite, SqlCE, Firebird etc..
In your SignUpForm.cs file, implement the logic to insert user registration data into the Users table using Dapper.
private async void btnSignUp_Click(object sender, EventArgs e)
{
    if (string.IsNullOrEmpty(txtUserName.Text))
    {
        MessageBox.Show("Please enter your username !", "Message", MessageBoxButtons.OK, MessageBoxIcon.Warning);
        txtUserName.Focus();
        return;
    }
    if (txtPassword.Text != txtConfirmPassword.Text)
    {
        MessageBox.Show("Password and Confirm password don't match !", "Message", MessageBoxButtons.OK, MessageBoxIcon.Warning);
        return;
    }
    IUserRepository repository = new UserRepository();
    bool result = await repository.Insert(new User() { UserName = txtUserName.Text, Password = txtPassword.Text, Email = txtEmail.Text, FullName = txtFullName.Text, Address = txtAddress.Text });
    if (result)
        MessageBox.Show("You have successfully signed up !", "Message", MessageBoxButtons.OK, MessageBoxIcon.Information);
    else
        MessageBox.Show("Error !", "Message", MessageBoxButtons.OK, MessageBoxIcon.Information);
}
Open your resource section, then create an InsertUser resource name as show below.
if not exists(select username from users where username=@UserName)
begin
	insert into users(username,password,email,fullname,address)
	values(@UserName,@Password,@Email,@FullName,@Address)
end
By following these steps, you can create a user registration form in your C# Windows Forms Application using SQL Server and Dapper ORM effectively.
VIDEO TUTORIAL
Categories
Popular Posts

Implement security headers for an ASP.NET Core
Jun 24, 2025

Structured Data using FoxLearn.JsonLd
Jun 20, 2025


RuangAdmin Template
Nov 13, 2024

Modular Admin Template
Nov 14, 2024