How to Create a Phone Book in C#
By Tan Lee Published on Jul 16, 2024 13.41K
Creating a diary application in C# Windows Forms using a Dataset involves several steps.
Here's a basic guide to get you started:
Open Visual Studio and create a new C# Windows Forms Application project, Name your project "PhoneBook" and then click OK
Design the UI for your Phone Book application. You might want to include textboxes for entering contact information, buttons for adding, updating, and deleting contacts, and a DataGridView to display the contacts.
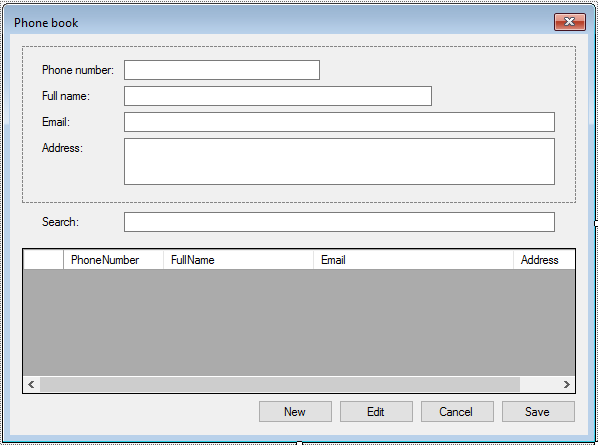
In the Solution Explorer, right-click your project and choose "Add" > "New Item". Select "DataSet" from the list of templates and give it a meaningful name like "PhoneBook.xsd". This DataSet will represent the structure of your data.
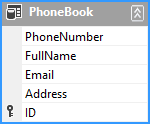
Open the DataSet designer by double-clicking the .xsd file. Here, you can define the schema of your dataset, including tables and columns. Add a table to represent your contact information with columns like FullName, Phone Number, Email, etc.
Drag and drop a DataGridView control onto your form. Set its DataSource property to the DataTable in your DataSet.
Write code to perform CRUD (Create, Read, Update, Delete) operations on the DataSet as shown below.
namespace PhoneBook
{
    public partial class Form1 : Form
    {
        public Form1()
        {
            InitializeComponent();
        }

        private void btnNew_Click(object sender, EventArgs e)
        {
            try
            {
                panel1.Enabled = true;
                //Add a new row
                App.PhoneBook.AddPhoneBookRow(App.PhoneBook.NewPhoneBookRow());
                phoneBookBindingSource.MoveLast();
                txtPhoneNumber.Focus();
            }
            catch (Exception ex)
            {
                MessageBox.Show(ex.Message, "Message", MessageBoxButtons.OK, MessageBoxIcon.Error);
                App.PhoneBook.RejectChanges();
            }
        }

        private void btnEdit_Click(object sender, EventArgs e)
        {
            panel1.Enabled = true;
            txtPhoneNumber.Focus();
        }

        private void btnCancel_Click(object sender, EventArgs e)
        {
            phoneBookBindingSource.ResetBindings(false);
            panel1.Enabled = false;
        }

        private void btnSave_Click(object sender, EventArgs e)
        {
            try
            {
                //End edit, save dataset to file
                phoneBookBindingSource.EndEdit();
                App.PhoneBook.AcceptChanges();
                App.PhoneBook.WriteXml(string.Format("{0}//data.dat", Application.StartupPath));
                panel1.Enabled = false;
            }
            catch (Exception ex)
            {
                MessageBox.Show(ex.Message, "Message", MessageBoxButtons.OK, MessageBoxIcon.Error);
                App.PhoneBook.RejectChanges();
            }
        }

        //Use singleton pattern to create an instance
        static AppData db;
        protected static AppData App
        {
            get
            {
                if (db == null)
                    db = new AppData();
                return db;
            }
        }

        private void Form1_Load(object sender, EventArgs e)
        {
            //Read file, then load data to dataset
            string fileName = string.Format("{0}//data.dat", Application.StartupPath);
            if (File.Exists(fileName))
                App.PhoneBook.ReadXml(fileName);
            phoneBookBindingSource.DataSource = App.PhoneBook;
            panel1.Enabled = false;
        }

        private void dataGridView_KeyDown(object sender, KeyEventArgs e)
        {
            if (e.KeyCode == Keys.Delete)
            {
                if (MessageBox.Show("Are you sure want to delete this record?", "Message", MessageBoxButtons.YesNo, MessageBoxIcon.Question) == DialogResult.Yes)
                    phoneBookBindingSource.RemoveCurrent();
            }
        }

        private void txtSearch_KeyPress(object sender, KeyPressEventArgs e)
        {
            if (e.KeyChar == (char)13)//Enter key
            {
                if (!string.IsNullOrEmpty(txtSearch.Text))
                {
                    //you can use linq to query data
                    var query = from o in App.PhoneBook
                                where o.PhoneNumber == txtSearch.Text || o.FullName.ToLowerInvariant().Contains(txtSearch.Text.ToLowerInvariant()) || o.Email.ToLowerInvariant() == txtSearch.Text.ToLowerInvariant()
                                select o;
                    dataGridView.DataSource = query.ToList();
                }
                else
                    dataGridView.DataSource = phoneBookBindingSource;
            }
        }
    }
}
Bind the textboxes to the respective columns of the DataGridView so that when you select a row in the DataGridView, the data will be displayed in the textboxes for editing.
Handle events such as clicking buttons to add, update, or delete contacts, and selection changed event of the DataGridView to populate data into textboxes for editing.
VIDEO TUTORIAL


