How to Insert Update Delete View and Search data from SQL Server in C#
By Tan Lee Published on Jun 01, 2017 13.65K
This article demonstrates how to build such an application using Entity Framework, SQL Server, and Windows Forms in C#.
How to Insert Update Delete View and Search data from SQL Server in C#?
Open Visual Studio, then click New Project, then select Visual C# on the left, then Windows and then select Windows Forms Application. Name your project "CRUDSqlServer" and then click OK
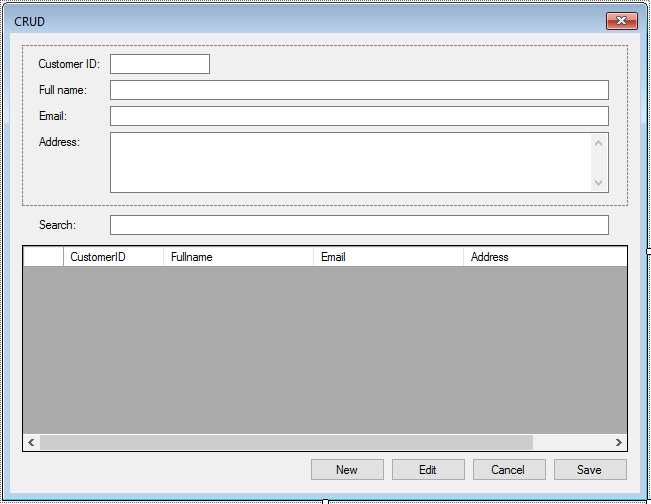
Design your form as shown below.

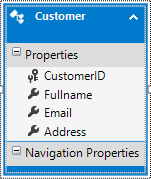
Create a Customer table, then create an EF Model by using Entity Framework as below

The application implements a search feature that dynamically filters customer records. By pressing Enter in the search box, users can search by CustomerID, Fullname, Email, or Address.
private void txtSearch_KeyPress(object sender, KeyPressEventArgs e)
{
    if (e.KeyChar == (char)13)//Enter key
    {
        if (string.IsNullOrEmpty(txtSearch.Text))
        {
            dataGridView.DataSource = customerBindingSource;
        }
        else
        {
            //using linq to query data
            var query = from o in customerBindingSource.DataSource as List<Customer>
                        where o.CustomerID == txtSearch.Text || o.Fullname.Contains(txtSearch.Text) || o.Email == txtSearch.Text || o.Address.Contains(txtSearch.Text)
                        select o;
            dataGridView.DataSource = query.ToList();
        }
    }
}
The KeyPress event captures the Enter key press. If the search box is empty, all data is shown; otherwise, LINQ queries filter the dataset.
The New button allows users to create new customer records.
private void btnNew_Click(object sender, EventArgs e)
{
    try
    {
        panel.Enabled = true;
        txtCustomerID.Focus();
        //Create a new customer, then add to binding source
        Customer c = new Customer();
        test.Customers.Add(c);
        customerBindingSource.Add(c);
        customerBindingSource.MoveLast();
    }
    catch (Exception ex)
    {
        MessageBox.Show(ex.Message, "Message", MessageBoxButtons.OK, MessageBoxIcon.Error);
    }
}
A new Customer object is created and added to the DbSet and the BindingSource. The form fields become editable, allowing users to input data.
Clicking the Edit button enables the form fields for editing.
private void btnEdit_Click(object sender, EventArgs e)
{
    panel.Enabled = true;
    txtCustomerID.Focus();
}
The panel containing the form controls is enabled, making fields editable.
The Cancel button reverts unsaved changes.
private void btnCancel_Click(object sender, EventArgs e)
{
    panel.Enabled = false;
    customerBindingSource.ResetBindings(false);
    foreach (DbEntityEntry entry in test.ChangeTracker.Entries())
    {
        //Check your object state
        switch (entry.State)
        {
            case EntityState.Added:
                entry.State = EntityState.Detached;
                break;
            case EntityState.Modified:
                entry.State = EntityState.Unchanged;
                break;
            case EntityState.Deleted:
                entry.Reload();
                break;
        }
    }
}
The ChangeTracker reverts the entity state for all pending changes:
- Added entities are detached.
- Modified entities are reverted to unchanged.
- Deleted entities are reloaded.
The Save button commits changes to the SQL Server database.
private void btnSave_Click(object sender, EventArgs e)
{
    try
    {
        //End edit & save data to sql database
        customerBindingSource.EndEdit();
        test.SaveChangesAsync();
        panel.Enabled = false;
    }
    catch (Exception ex)
    {
        MessageBox.Show(ex.Message, "Message", MessageBoxButtons.OK, MessageBoxIcon.Error);
        customerBindingSource.ResetBindings(false);
    }
}
Edits in the BindingSource are finalized. Changes are saved asynchronously to the database using SaveChangesAsync.
The Delete action is triggered via the DataGridView when the Delete key is pressed.
// delete record c# entity
private void dataGridView_KeyDown(object sender, KeyEventArgs e)
{
    if (e.KeyCode == Keys.Delete)
    {
        if (MessageBox.Show("Are you sure want to delete this record ?", "Message", MessageBoxButtons.YesNo, MessageBoxIcon.Question) == DialogResult.Yes)
        {
            test.Customers.Remove(customerBindingSource.Current as Customer);
            customerBindingSource.RemoveCurrent();
        }
    }
}
The record is removed from the DbSet and the BindingSource. A confirmation dialog ensures intentional deletion.
When the form loads, customer data is fetched and bound to the DataGridView.
private void Form1_Load(object sender, EventArgs e)
{
    panel.Enabled = false;
    test = new TestEntities();
    //Load data to binding source
    customerBindingSource.DataSource = test.Customers.ToList();
}
The TestEntities context retrieves all customers from the database. The results are assigned to the BindingSource.
Add code to handle your form as shown below.
using System;
using System.Collections.Generic;
using System.Data;
using System.Data.Entity;
using System.Data.Entity.Infrastructure;
using System.Linq;
using System.Windows.Forms;

namespace CRUDSqlServer
{
    public partial class Form1 : Form
    {
        TestEntities test;
        public Form1()
        {
            InitializeComponent();
        }
    }
}
This application demonstrates the integration of Entity Framework with Windows Forms to perform CRUD operations seamlessly. It highlights the use of LINQ for querying data, data binding for UI updates, and the Entity Framework's DbContext for managing database operations.
VIDEO TUTORIAL
- How to Insert Update Delete data in Database from DataGridView in C#
- How to Insert Update Delete View data in SQL Server using 3 Tiers in C#
- How to Insert Update Delete Select in SQL Server in C#
- How to Insert Update Delete Search data from local database in C#
- How to Insert Update Delete View and Search data from MS Access in C#
- How to Insert Update Delete and View data from SQL Database using NPoco ORM in C#
- Insert Update Delete and View data from SQL Database using ORM Lite in C#
- How to Insert Update Delete Search Records in C#


