How to Connect and Use Local Database in Visual Studio 2019
By Tan Lee Published on Jul 16, 2024 31.94K
To connect and use a local database in a C# Windows Forms application using Visual Studio 2019, you can follow these steps.
What is a local database?
A service-based database are databases that are accessed only through a database server. Local database is a database that is used only locally for your application.
Through this c# example, you will learn how to create a local database in visual studio 2019, then use the visual studio to connect to the local database.
Next, create a new table to the local database and create a simple winform to help you insert update delete select data from the local database using c# code.
How do I create a SQL database in Visual Studio?
To connect and use a local database in C#, you typically follow these steps.
Create Database: Create your database file or instance. If you're using SQLite, this is usually just creating a file with a
.sqliteor.dbextension.Connect to Database: Write code or drag and drop the table that you want to perform CRUD Operations, then connect to your database from your C# application. This usually involves using a connection string that specifies the location and other connection details of your database.
Creating a new Windows Forms Application project, then right click on your project->Add->New item->Service-based Database.
Click the Server Explorer tab on the left, then add a new connection to the local database.

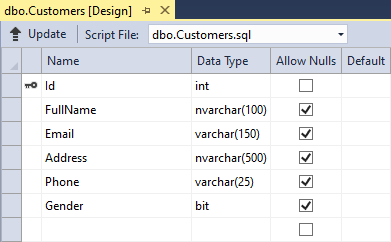
Next, Add the sql script below to create a new Customer table.
CREATE TABLE [dbo].[Customers] (
    [Id]       INT            NOT NULL,
    [FullName] NVARCHAR (100) NULL,
    [Email]    VARCHAR (150)  NULL,
    [Address]  NVARCHAR (500) NULL,
    [Phone]    VARCHAR (25)   NULL,
    [Gender]   BIT            NULL,
    PRIMARY KEY CLUSTERED ([Id] ASC)
);
or you can design the table from the sql designer.
Where is LocalDB stored?
You can find the local database in the same directory of your project.
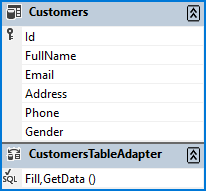
After creating a Customer table, click the Data Source tab on the left side, then add a new datasource to your project.
How to connect local database in c# windows application?
Finally, Drag and drop the fields of your datasource to your winform, then design a simple UI allows you to insert update delete select in c# sql as shown below.

Visual studio automatically adds the Form_Load event handler to help you retrieve data from your database.
private void Form1_Load(object sender, EventArgs e)
{
    // TODO: This line of code loads data into the 'modelDataSet.Customers' table. You can move, or remove it, as needed.
    this.customersTableAdapter.Fill(this.modelDataSet.Customers);

}
Adding the click event handler to the Save item allows you to save data to the local database.
private void CustomersBindingNavigatorSaveItem_Click(object sender, EventArgs e)
{
    this.Validate();
    this.customersBindingSource.EndEdit();
    this.tableAdapterManager.UpdateAll(this.modelDataSet);

}
Adding the CheckedChanged event handler to the CheckBox control allows you to change Combobox text.
private void GenderCheckBox_CheckedChanged(object sender, EventArgs e)
{
    if (genderCheckBox.CheckState == CheckState.Checked)
        genderCheckBox.Text = "Male";
    else if (genderCheckBox.CheckState == CheckState.Unchecked)
        genderCheckBox.Text = "Female";
    else
        genderCheckBox.Text = "??";
}
VIDEO TUTORIAL
Categories
Popular Posts


Freedash bootstrap lite
Nov 13, 2024

Gentella Admin Template
Nov 14, 2024

tsParticles Authentication Template
Nov 11, 2024

Responsive Animated Login Form
Nov 11, 2024