How to Insert Update Delete Search data from local database in C#
By Tan Lee Published on Jul 24, 2017 10.58K
This article will demonstrate how to build a Telephone Diary application featuring CRUD operations, search functionality, and user-friendly UI interactions.
How to Insert Update Delete Search data from local database in C#?
Open Visual Studio, then click New Project, then select Visual C# on the left, then Windows and then select Windows Forms Application. Name your project "TelephoneDiary" and then click OK
Add MaterialSkin to your project via NuGet by right-clicking on your project select Manage NuGet Packages -> Search MaterialSkin -> Install

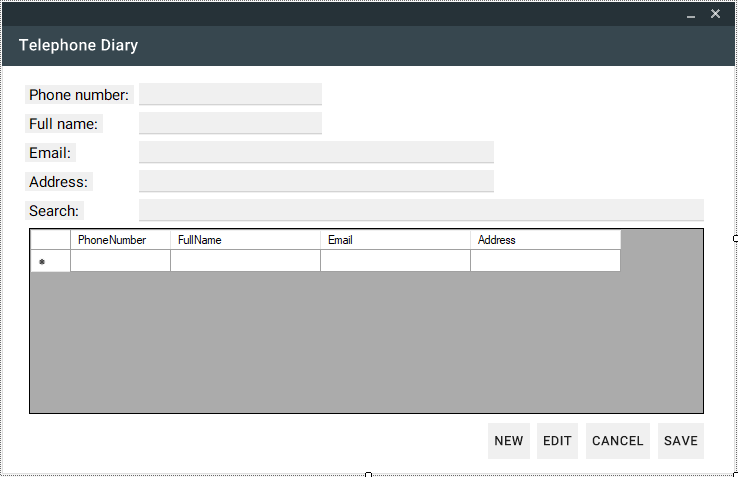
Design your form as shown below.
Create a local database, then add phonebook table to your dataset
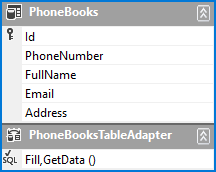
Add a bindingsource to your windows form application

On form load, fetch data from the database and configure controls for the initial state:
private void Form1_Load(object sender, EventArgs e)
{
    // TODO: This line of code loads data into the 'appData.PhoneBooks' table. You can move, or remove it, as needed.
    this.phoneBooksTableAdapter.Fill(this.appData.PhoneBooks);
    Edit(false);
}

// Enable or disable editing fields
private void Edit(bool value)
{
    txtPhoneNumber.Enabled = value;
    txtFullName.Enabled = value;
    txtEmail.Enabled = value;
    txtAddress.Enabled = value;
}
To add a new contact, enable editing mode and create a new row in the data source:
private void btnNew_Click(object sender, EventArgs e)
{
    try
    {
        //Add a new object to binding source
        Edit(true);
        appData.PhoneBooks.AddPhoneBooksRow(appData.PhoneBooks.NewPhoneBooksRow());
        phoneBooksBindingSource.MoveLast();
        txtPhoneNumber.Focus();
    }
    catch (Exception ex)
    {
        MessageBox.Show(ex.Message, "Message", MessageBoxButtons.OK, MessageBoxIcon.Error);
        appData.PhoneBooks.RejectChanges();
    }
}
Enable fields for editing when updating records, then save the changes back to the database:
private void btnEdit_Click(object sender, EventArgs e)
{
    Edit(true);
    txtPhoneNumber.Focus();
}

private void btnSave_Click(object sender, EventArgs e)
{
    try
    {
        // Save data
        Edit(false);
        phoneBooksBindingSource.EndEdit();
        phoneBooksTableAdapter.Update(appData.PhoneBooks);
        dataGridView.Refresh();
        txtPhoneNumber.Focus();
        MessageBox.Show("Your data has been successfully saved.", "Message", MessageBoxButtons.OK, MessageBoxIcon.Information);
    }
    catch (Exception ex)
    {
        MessageBox.Show(ex.Message, "Error", MessageBoxButtons.OK, MessageBoxIcon.Error);
        appData.PhoneBooks.RejectChanges();
    }
}
Allow users to cancel editing by resetting bindings:
private void btnCancel_Click(object sender, EventArgs e)
{
    Edit(false);
    phoneBooksBindingSource.ResetBindings(false);
}
Implement search functionality with a KeyDown event on the search box to filter data dynamically:
private void txtSearch_KeyDown(object sender, KeyEventArgs e)
{
    if (e.KeyCode == Keys.Enter)
    {
        //Filter data
        if (!string.IsNullOrEmpty(txtSearch.Text))
            phoneBooksBindingSource.Filter = string.Format("PhoneNumber = '{0}' OR FullName LIKE '*{1}*' OR Email = '{2}' OR Address LIKE '*{3}*'", txtPhoneNumber.Text, txtFullName.Text, txtEmail.Text, txtAddress.Text);
        else
            phoneBooksBindingSource.Filter = string.Empty;
    }
}
Handle record deletion directly from the DataGridView with a confirmation dialog:
private void dataGridView_KeyDown(object sender, KeyEventArgs e)
{
    //Delete data from sql database
    if (e.KeyCode == Keys.Delete)
    {
        if (MessageBox.Show("Are you sure want to delete this record?", "Message", MessageBoxButtons.YesNo, MessageBoxIcon.Question) == DialogResult.Yes)
            phoneBooksBindingSource.RemoveCurrent();
    }
}
Set up the Material Skin theme in your form constructor.
using System;
using System.Collections.Generic;
using System.ComponentModel;
using System.Data;
using System.Drawing;
using System.Linq;
using System.Text;
using System.Threading.Tasks;
using System.Windows.Forms;
using MaterialSkin;

namespace TelephoneDiary
{
    public partial class Form1 : MaterialSkin.Controls.MaterialForm
    {
        public Form1()
        {
            InitializeComponent();
            // Initialize MaterialSkin
            var skinManager = MaterialSkinManager.Instance;
            skinManager.AddFormToManage(this);
            skinManager.Theme = MaterialSkinManager.Themes.DARK;
            skinManager.ColorScheme = new ColorScheme(Primary.BlueGrey800, Primary.BlueGrey900, Primary.BlueGrey500, Accent.LightBlue200, TextShade.WHITE);
        }
    }
}
VIDEO TUTORIAL
- How to Insert Update Delete View and Search data from SQL Server in C#
- How to Insert Update Delete data in Database from DataGridView in C#
- How to Insert Update Delete View data in SQL Server using 3 Tiers in C#
- How to Insert Update Delete Select in SQL Server in C#
- How to Insert Update Delete View and Search data from MS Access in C#
- How to Insert Update Delete and View data from SQL Database using NPoco ORM in C#
- Insert Update Delete and View data from SQL Database using ORM Lite in C#
- How to Insert Update Delete Search Records in C#


