How to Create Contact Form Flat Responsive in ASP.NET MVC
By Tan Lee Published on May 29, 2017 10.69K
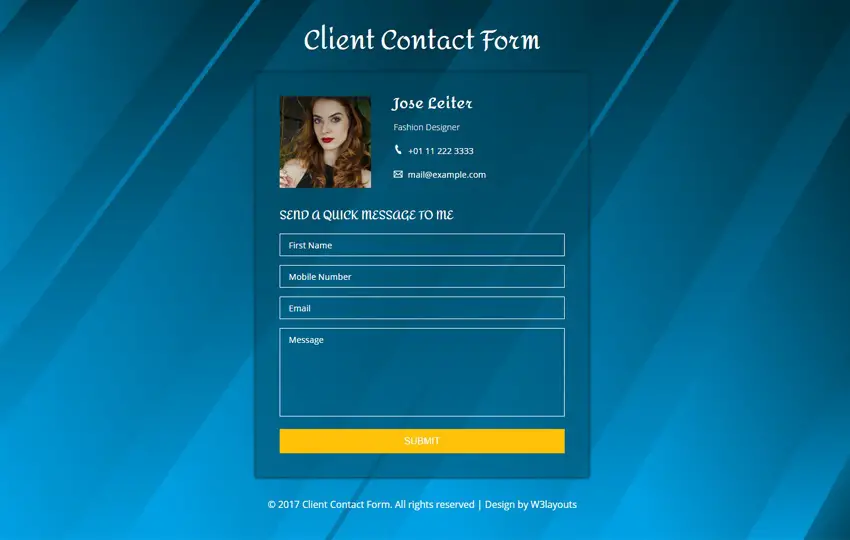
The client contact form features a modern, eye-catching design with a transparent background for the form content, creating an elegant and visually appealing look. It's ideal for gathering feedback, reviews, opinions, and suggestions from customers or viewers about your business, projects, or work.
The form includes options to display your image and contact details (phone and email). Fully responsive and cross-browser compatible, this widget works seamlessly across all devices and screen sizes. Built with HTML5 and CSS3, it offers a sleek, professional design.
How to Create Contact Form Flat Responsive in ASP.NET MVC
Below is a step-by-step guide to creating a flat, responsive contact form that integrates with the Entity Framework and utilizes ASP.NET Identity for authentication and user management.
Download Client Contact Form a Flat Responsive Widget Template

Open Visual Studio and create a new project.
Select ASP.NET Web Application and choose the MVC template.
Ensure that Authentication is set to Individual User Accounts (to use ASP.NET Identity).
In the Solution Explorer, right-click on Models folder and add a new class called Contact to represent the data for your contact form.
[Table("Contacts")]
public class Contact
{
    public int Id { get; set; }
    [StringLength(100)]
    [Required]
    public string FullName { get; set; }
    [StringLength(100), Required]
    public string Email { get; set; }
    [StringLength(1000), Required]
    public string Message { get; set; }
    [StringLength(15), Required]
    public string PhoneNumber { get; set; }
}
Next, update your DbContext (in ApplicationDbContext.cs), which is where ASP.NET Identity's user data resides.
Add a DbSet for the Contact entity like this:
public class ApplicationDbContext : IdentityDbContext<ApplicationUser>
{
    public ApplicationDbContext()
        : base("DefaultConnection", throwIfV1Schema: false)
    {
    }

    public DbSet<Contact> Contacts { get; set; }

    public static ApplicationDbContext Create()
    {
        return new ApplicationDbContext();
    }
}
Now, run Code First Migrations to create the necessary database table for the contact form.
Open Package Manager Console and run:
Enable-Migrations
Add-Migration AddContactFormTable
Update-Database
Next, Add a ContactController in the Controllers folder.
public class ContactController : Controller
{
    ApplicationDbContext context;

    public ContactController()
    {
        context = new ApplicationDbContext();
    }

    // GET: Contact
    public ActionResult Index()
    {
        return View(context.Contacts.ToList());
    }

    public ActionResult Create()
    {
        return View(new Contact());
    }

    [HttpPost]
    [ValidateAntiForgeryToken]// POST: ContactForm
    public async Task<ActionResult> Create(Contact model)
    {
        if (ModelState.IsValid)
        {
            context.Contacts.Add(model);
            await context.SaveChangesAsync();
            return RedirectToAction("Index");
        }
        return View(model);
    }

    public ActionResult Profile()
    {
        return View(new Contact());
    }

    [HttpPost]
    [ValidateAntiForgeryToken]
    public async Task<ActionResult> Profile(Contact model)
    {
        if (ModelState.IsValid)
        {
            context.Contacts.Add(model);
            await context.SaveChangesAsync();//Save data to sql database
            return RedirectToAction("Index");
        }
        return View(model);
    }
}
Right click on Index action, then create an Index view, similar for Create and Profile action
@model IEnumerable<MvcDemo.Models.Contact>
@{
    ViewBag.Title = "Index";
}
<h2>Index</h2>
<p>
    @Html.ActionLink("Create New", "Create")
</p>
<table class="table">
    <tr>
        <th>
            @Html.DisplayNameFor(model => model.FullName)
        </th>
        <th>
            @Html.DisplayNameFor(model => model.Email)
        </th>
        <th>
            @Html.DisplayNameFor(model => model.Message)
        </th>
        <th>
            @Html.DisplayNameFor(model => model.PhoneNumber)
        </th>
        <th></th>
    </tr>
    @foreach (var item in Model)
    {
        <tr>
            <td>
                @Html.DisplayFor(modelItem => item.FullName)
            </td>
            <td>
                @Html.DisplayFor(modelItem => item.Email)
            </td>
            <td>
                @Html.DisplayFor(modelItem => item.Message)
            </td>
            <td>
                @Html.DisplayFor(modelItem => item.PhoneNumber)
            </td>
            <td>
                @Html.ActionLink("Edit", "Edit", new { id = item.Id }) |
                @Html.ActionLink("Details", "Details", new { id = item.Id }) |
                @Html.ActionLink("Delete", "Delete", new { id = item.Id })
            </td>
        </tr>
    }
</table>
Add code to Create view
@model MvcDemo.Models.Contact
@{
    Layout = null;
}

<!DOCTYPE html>
<html>
<head>
    <title>Client Contact Form Flat Responsive Widget Template :: w3layouts</title>
    <meta name="viewport" content="width=device-width, initial-scale=1">
    <meta http-equiv="Content-Type" content="text/html; charset=utf-8" />
    <meta name="keywords" content="Client Contact Form template Responsive, Login form web template,Flat Pricing tables,Flat Drop downs  Sign up Web Templates, Flat Web Templates, Login sign up Responsive web template, SmartPhone Compatible web template, free web designs for Nokia, Samsung, LG, SonyEricsson, Motorola web design" />
    <script type="application/x-javascript"> addEventListener("load", function() { setTimeout(hideURLbar, 0); }, false); function hideURLbar(){ window.scrollTo(0,1); } </script>
    <!-- Custom Theme files -->
    <link href="/clientcontact/css/style.css" rel="stylesheet" type="text/css" media="all" />
    <!-- //Custom Theme files -->
    <!-- web font -->
    <link href='//fonts.googleapis.com/css?family=Open+Sans:400,300,600,700,800' rel='stylesheet' type='text/css'><!--web font-->
    <link href="//fonts.googleapis.com/css?family=Amita:400,700" rel="stylesheet">
    <!-- //web font -->
</head>
<body>
    <!-- main -->
    <div class="main">
        <h1>Client Contact Form</h1>
        <div class="main-row">
            <div class="agileits-info">
                <div class="agileits-infoleft">
                    <img src="/clientcontact/images/img1.jpg" alt="" />
                </div>
                <div class="agileits-inforight">
                    <h2>Jose Leiter</h2>
                    <h6>Fashion Designer</h6>
                    <p><img src="/clientcontact/images/i1.png" alt=""> +01 11 222 3333</p>
                    <p><img src="/clientcontact/images/i2.png" alt=""> <a href="mailto:[email protected]"> [email protected]</a></p>
                </div>
                <div class="clear"> </div>
            </div>
            <h3>SEND A QUICK MESSAGE TO ME</h3>
            <div class="contact-wthree">
                @using (Html.BeginForm("Create", "Contact", FormMethod.Post))
                {
                    @Html.AntiForgeryToken()
                    @Html.TextBoxFor(m => m.FullName, new { @placeholder = "Full name" })
                    @Html.ValidationMessageFor(m=>m.FullName)
                    @Html.TextBoxFor(m => m.PhoneNumber, new { @placeholder = "Mobile Number" })
                    @Html.ValidationMessageFor(m => m.PhoneNumber)
                    @Html.TextBoxFor(m => m.Email, new { @placeholder = "Email" })
                    @Html.ValidationMessageFor(m => m.Email)
                    @Html.TextAreaFor(m => m.Message, new { @placeholder = "Message" })
                    @Html.ValidationMessageFor(m => m.Message)
                    <input type="submit" value="SUBMIT">
                }
            </div>
        </div>
    </div>
    <!-- //main -->
    <!-- copyright -->
    <div class="w3copyright-agile">
        <p>© 2017 Client Contact Form. All rights reserved | Design by <a href="http://w3layouts.com/" target="_blank">W3layouts</a></p>
    </div>
    <!-- //copyright -->
</body>
</html>
Add code to Profile view
@model MvcDemo.Models.Contact
@{
    Layout = null;
}

<!DOCTYPE html>
<html>
<head>
    <title>Profile Contact Form Flat Responsive Widget Template :: w3layouts</title>
    <meta name="viewport" content="width=device-width, initial-scale=1">
    <meta http-equiv="Content-Type" content="text/html; charset=utf-8" />
    <meta name="keywords" content="Profile Contact Form template Responsive, Login form web template,Flat Pricing tables,Flat Drop downs  Sign up Web Templates, Flat Web Templates, Login sign up Responsive web template, SmartPhone Compatible web template, free web designs for Nokia, Samsung, LG, SonyEricsson, Motorola web design" />
    <script type="application/x-javascript"> addEventListener("load", function() { setTimeout(hideURLbar, 0); }, false); function hideURLbar(){ window.scrollTo(0,1); } </script>
    <!-- Custom Theme files -->
    <link href="/profile/css/style.css" rel="stylesheet" type="text/css" media="all" />
    <!-- //Custom Theme files -->
    <!-- web font -->
    <link href='//fonts.googleapis.com/css?family=Open+Sans:400,300,600,700,800' rel='stylesheet' type='text/css'>
    <link href="//fonts.googleapis.com/css?family=Quicksand:300,400,500,700" rel="stylesheet">
    <!-- //web font -->
</head>
<body>
    <!-- main -->
    <div class="main">
        <h1>Profile Contact Form</h1>
        <div class="main-wthree-row">
            <h4><span>Lorem ipsum </span>dolor Sit amet consec tetur adip iscing elit.</h4>
            <div class="agileits-info">
                <div class="agileits-infoleft">
                    <img src="/profile/images/img1.jpg" alt="" />
                    <div class="agileits-infotext">
                        <h2>Jose Leiter</h2>
                        <h6>Fashion Designer</h6>
                    </div>
                </div>
                <div class="agileits-inforight">
                    <p><img src="/profile/images/i1.png" alt=""> +01 11 222 3333</p>
                    <p><img src="/profile/images/i2.png" alt=""> <a href="mailto:[email protected]"> [email protected]</a></p>
                </div>
                <div class="clear"> </div>
            </div>
            <h3>Send a message to me</h3>
            <div class="contact-wthree">
                @using (Html.BeginForm("Profile", "Contact", FormMethod.Post))
                {
                    @Html.AntiForgeryToken()
                    <div class="contact-w3left w3-agile">
                        @Html.TextBoxFor(m => m.FullName,new { @placeholder = "Full Name" })
                        @Html.TextBoxFor(m => m.PhoneNumber, new { @placeholder = "Mobile Number", @class = "email" })
                        @Html.TextBoxFor(m => m.Email, new { @placeholder = "Email" })
                    </div>
                    <div class="contact-w3right">
                        @Html.TextAreaFor(m => m.Message, new { @placeholder = "Message" })
                        <input type="submit" value="SUBMIT">
                    </div>
                    <div class="clear"> </div>
                }
            </div>
        </div>
    </div>
    <!-- //main -->
    <!-- copyright -->
    <div class="w3copyright-agile">
        <p>© 2017 Profile Contact Form. All rights reserved | Design by <a href="http://w3layouts.com/" target="_blank">W3layouts</a></p>
    </div>
    <!-- //copyright -->
</body>
</html>
By following these steps, you've created a basic contact form using ASP.NET MVC, ASP.NET Identity, and Entity Framework Code First.
VIDEO TUTORIAL
- ASP.NET MVC Responsive Templates Free Download
- How to upload file in ASP.NET MVC
- How to check if HttpPostedFileBase is an image
- How to upload Multiple File in ASP.NET MVC
- ASP.NET MVC: Implement Password Reset with ASP NET Identity
- ASP.NET MVC: Getting Started
- ASP.NET MVC: Create Custom Routes
- ASP.NET MVC: Create Login Form


