How to Insert Update Delete and View data in C# using Redis
By Tan Lee Published on May 26, 2017 8.46K
This article demonstrates how to handle CRUD operations using Redis in C# Windows Forms Application.
Implementing CRUD Operations with Redis in a Windows Forms Application?
Open Visual Studio, then click New Project, then select Visual C# on the left, then Windows and then select Windows Forms Application. Name your project "RedisCRUD" and then click OK
Right click on your project select Manage NuGet Packages -> Search metro framework, redis -> Install

To interact with Redis, we use the ServiceStack.Redis library.
Install-Package ServiceStack.Redis
Redis provides a fast and reliable storage solution, while ServiceStack.Redis simplifies the interaction with its rich API for typed data management.
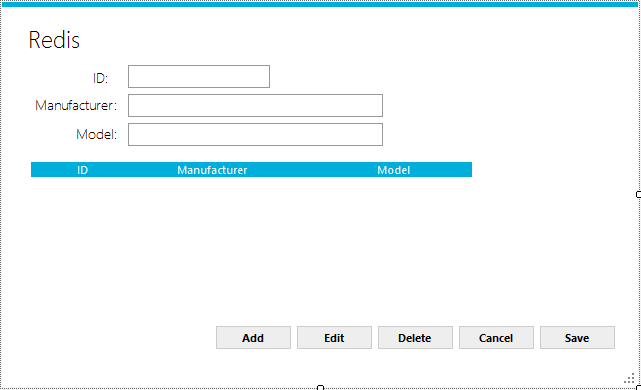
Design your metro form as shown below.

The Phone class is a basic representation of a phone entity with properties for ID, Model, and Manufacturer.
public class Phone
{
    public string ID { get; set; }
    public string Model { get; set; }
    public string Manufacturer { get; set; }
}
This class will serve as the data model for storing and managing phone data in Redis.
On form load, the application retrieves existing data from Redis and binds it to the form.
private void Form1_Load(object sender, EventArgs e)
{
    using (RedisClient client = new RedisClient("localhost", 6379))
    {
        IRedisTypedClient<Phone> phone = client.As<Phone>();
        phoneBindingSource.DataSource = phone.GetAll();
        Edit(true);//Read only
    }
}
The Edit method toggles read-only mode for the input fields:
void Edit(bool value)
{
    txtID.ReadOnly = value;
    txtManufaturer.ReadOnly = value;
    txtModel.ReadOnly = value;
}
The btnAdd_Click method creates a new Phone object and prepares the form for data entry:
private void btnAdd_Click(object sender, EventArgs e)
{
    phoneBindingSource.Add(new Phone());
    phoneBindingSource.MoveLast();
    Edit(false);//Allow edit
    txtID.Focus();
}
The btnEdit_Click method allows the user to modify the selected phone's details:
private void btnEdit_Click(object sender, EventArgs e)
{
    Edit(false);//Allow edit
    txtID.Focus();
}
The btnSave_Click method saves the current list of phones to Redis:
private void btnSave_Click(object sender, EventArgs e)
{
    using (RedisClient client = new RedisClient("localhost", 6379))
    {
        phoneBindingSource.EndEdit();
        IRedisTypedClient<Phone> phone = client.As<Phone>();
        //Get data from bindingsource, then save to redis cache
        phone.StoreAll(phoneBindingSource.DataSource as List<Phone>); // Save all data to Redis
        MetroFramework.MetroMessageBox.Show(this, "Your data has been successfully saved.", "Message", MessageBoxButtons.OK, MessageBoxIcon.Information);
        Edit(true);// Set fields to read-only
    }
}
The btnDelete_Click method removes the selected phone from Redis:
private void btnDelete_Click(object sender, EventArgs e)
{
    if (MetroFramework.MetroMessageBox.Show(this, "Are you sure want to delete this record ?", "Message", MessageBoxButtons.YesNo, MessageBoxIcon.Question) == DialogResult.Yes)
    {
        Phone p = phoneBindingSource.Current as Phone;// Get selected phone
        if (p != null)
        {
            //Connect to your redis cache
            using (RedisClient client = new RedisClient("localhost", 6379))
            {
                IRedisTypedClient<Phone> phone = client.As<Phone>();
                phone.DeleteById(p.ID); // Delete phone by ID
                phoneBindingSource.RemoveCurrent();
            }
        }
    }
}
The btnCancel_Click method resets the form and reverts unsaved changes:
private void btnCancel_Click(object sender, EventArgs e)
{
    Edit(true); // Set fields to read-only
    phoneBindingSource.ResetBindings(false); // Revert changes
    ClearText();
}
If you don't have install redis, you can view How to download and install redis cache
VIDEO TUTORIAL


